Adding GST details in your WhatsApp Business API billing is an important step for businesses operating in India. It ensures correct taxation, proper invoicing, and compliance with government regulations. When you are using a WhatsApp Business API provider like Interakt, GST details can be added directly from the billing or subscription settings.
Why GST Details Are Required in WhatsApp Business API Billing
WhatsApp Business API is a paid service, and businesses are charged monthly subscription fees and message usage costs. If GST details are not added, invoices may be generated without GST input credit eligibility.
By adding GST details:
- GST-compliant invoices are generated
- Input tax credit can be claimed
- Business billing remains legally compliant
- Proper documentation is maintained
This process is applicable whether you are using Interakt or any similar WhatsApp Business API.
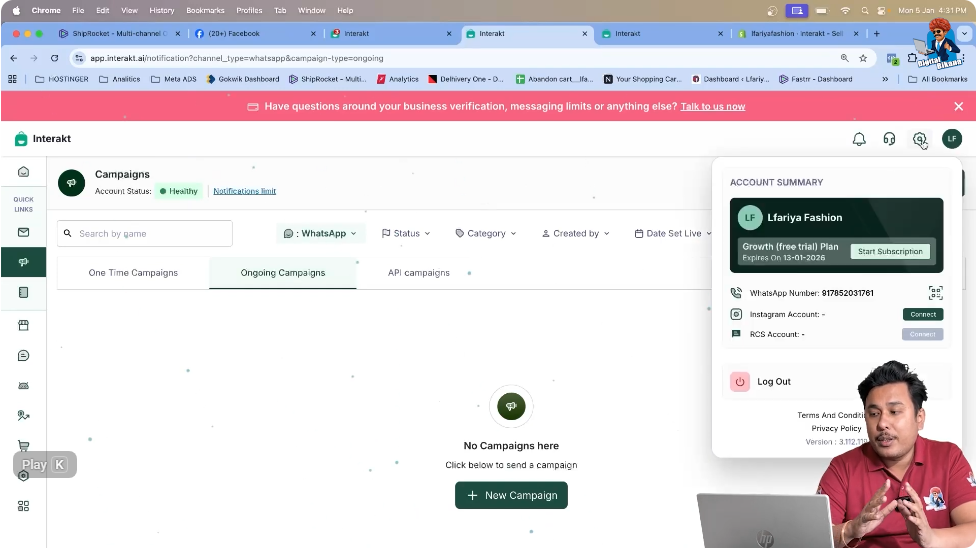
Accessing the WhatsApp Business API Admin Dashboard
Before adding GST details, you must be logged in to your WhatsApp Business API provider’s admin dashboard.
Once logged in:
- You will be inside the Interakt admin panel
- All billing and subscription-related settings are managed from here
- GST details are added from the subscription management section
How to Add GST Details in WhatsApp Business API Billing?
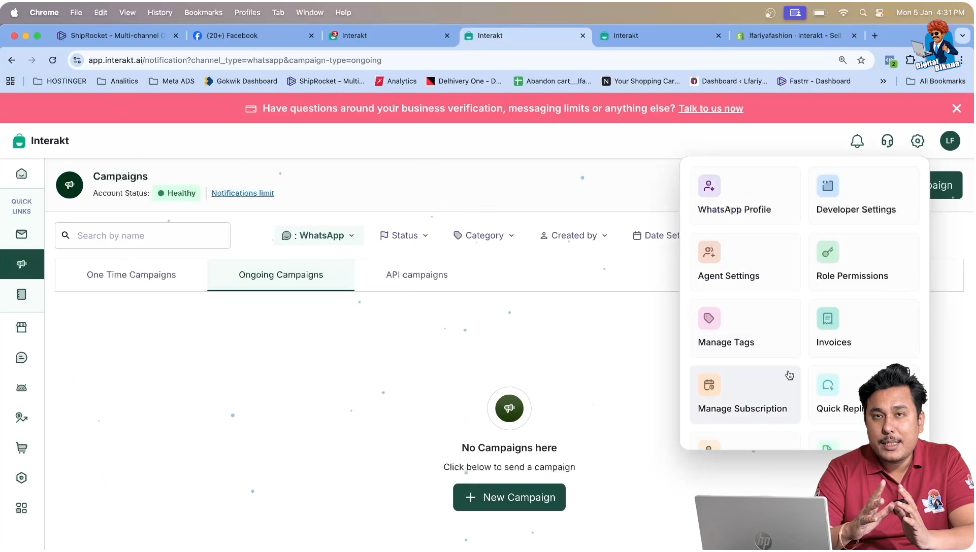
Step 1: Open the Settings Section in the Admin Dashboard
Locate the Settings Tab
After logging into Interakt, go to the admin dashboard.
On the dashboard, locate the Settings tab.
This section contains all configuration options related to:
- Account settings
- Billing and subscriptions
- Payment and tax details
Click on the Settings tab to proceed.
Step 2: Go to Manage Subscription
Access Subscription Management
Inside the Settings section, look for the Manage Subscription option.
This is the area where:
- Billing plans are managed
- Subscription status is controlled
- GST and tax-related information is added
Click on Manage Subscription to move forward.
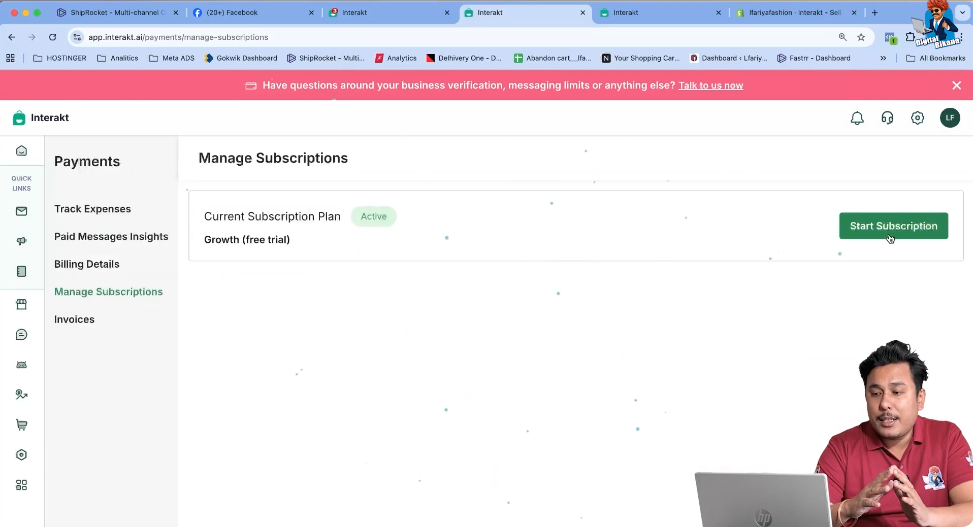
Step 3: Start the Subscription Process
Click on Start Subscription
Once you are inside the Manage Subscription section, click on Start Subscription.
This step is required to:
- Activate billing
- Configure tax details
- Finalize subscription-related information
Starting the subscription allows you to enter GST-related data.
Step 4: Select the Country
Choose the Applicable Country
After starting the subscription, you will be asked to select the country.
Since GST is applicable in India:
- Select India as the country
- This enables GST-related input fields
Country selection is mandatory because tax rules vary by region.
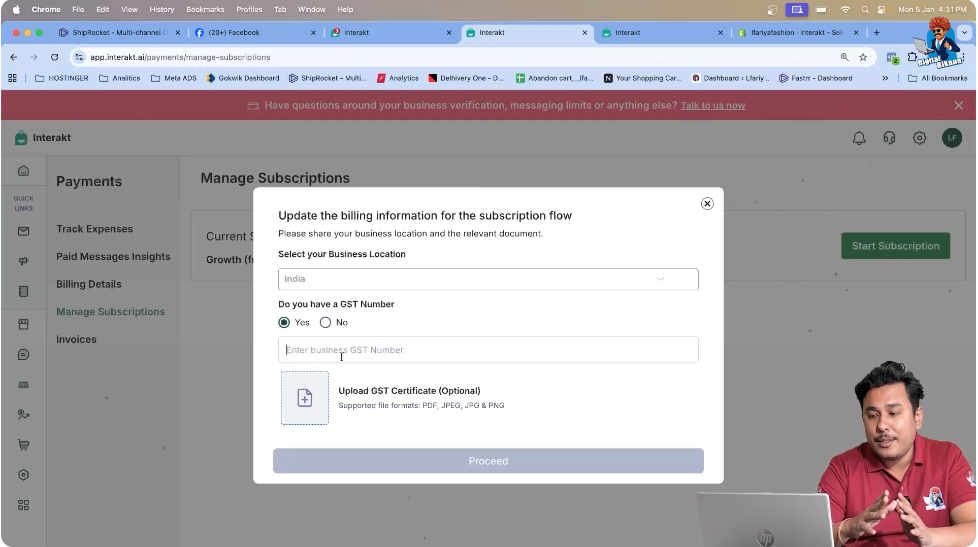
Step 5: Confirm GST Availability
Indicate That You Have a GST Number
Once the country is selected, the system will ask whether you have a GST number.
If you have a GST number:
- Select Yes
- GST input fields will become visible
This step confirms that your business is registered under GST.
Step 6: Enter the GST Number
Provide the GST Identification Number
After selecting Yes, enter your GST number in the provided field.
Ensure that:
- The GST number is entered correctly
- There are no typing errors
- The format matches the official GST structure
This GST number will be used for billing and invoice generation.

Step 7: Upload the GST Certificate
Select the GST Certificate File
After entering the GST number, you need to upload your GST certificate.
- Click on the upload option
- Select the GST certificate file from your system
- The file can be in PDF format, as shown in the video
The GST certificate serves as proof of registration.
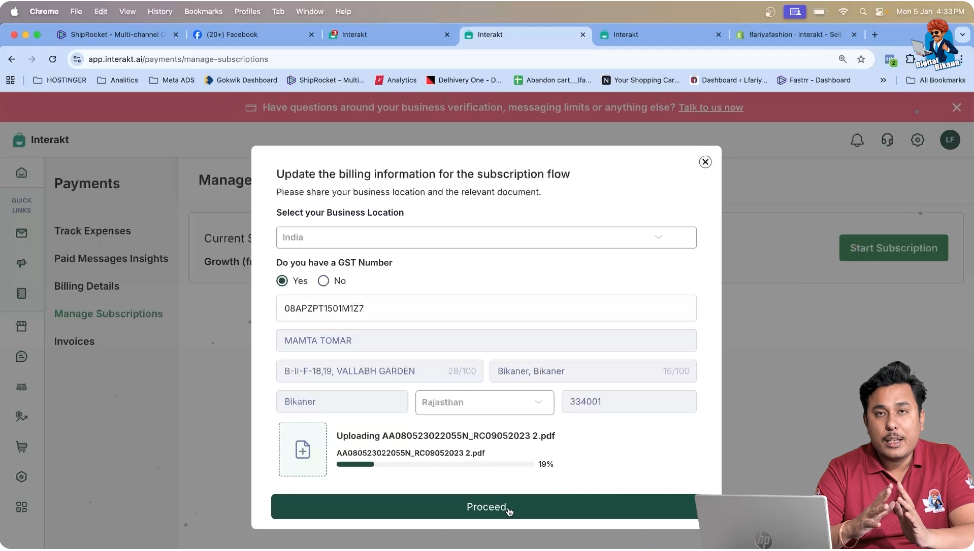
Step 8: Proceed to Save GST Details
Finalize the GST Update
Once the GST number is entered and the certificate is uploaded:
- Click on Proceed
After clicking proceed:
- The GST number is added to the WhatsApp Business API billing system
- Billing invoices will now reflect GST details
This completes the GST update process.

Confirmation of GST Update in WhatsApp Business API Billing
After completing the steps:
- Your GST number is successfully linked to the billing system
- All future invoices will include GST
- The billing setup becomes compliant with Indian tax laws
No additional configuration is required after this step.
Applicability Across WhatsApp Business API Providers
Although this process is demonstrated using Interakt, the same principle applies to other WhatsApp Business API platforms.
In general:
- GST details are added from billing or subscription settings
- GST number and certificate are required
- Country selection determines tax applicability
The steps remain similar across platforms.
Common Points to Keep in Mind
- Always upload a valid GST certificate
- Ensure the GST number matches official records
- Use a clear and readable PDF file
- Complete GST setup before final billing begins
Incorrect GST details can lead to billing issues or invalid invoices.
Summary
In this article, we learned how to add GST details in WhatsApp Business API billing using the Interakt admin dashboard.
The process included:
- Opening the settings section
- Managing the subscription
- Starting the subscription
- Selecting the country
- Confirming GST availability
- Entering the GST number
- Uploading the GST certificate
- Proceeding to save the details
Each step ensures proper billing compliance.
Conclusion
Adding GST details in WhatsApp Business API billing is a simple yet essential process for businesses. By completing this setup, businesses ensure legal compliance, accurate invoicing, and smooth subscription management.
Related Posts