Creating a marketing template is one of the most important steps when working with WhatsApp Business API. After uploading contacts, templates allow you to send structured, approved, and professional messages to users at scale. In this article, we will understand how to design a marketing template in Interakt and how to connect it with a custom auto-reply journey so that users can continue the conversation smoothly.
Understanding the Role of Templates in WhatsApp Business API
Before sending any marketing message through WhatsApp Business API, it is mandatory to create a template. Templates are pre-approved message formats that WhatsApp allows businesses to use for promotions, notifications, and re-engagement.
Earlier, we learned how to upload contacts into Whatsapp Business API. Once contacts are uploaded, the next step is message creation. This message creation process is done through templates. After templates are created and approved, they can be used inside marketing campaigns or automation flows.
How to Create a Marketing Template in WhatsApp Business API?
Step 1: Navigating to the Template Section in Interakt
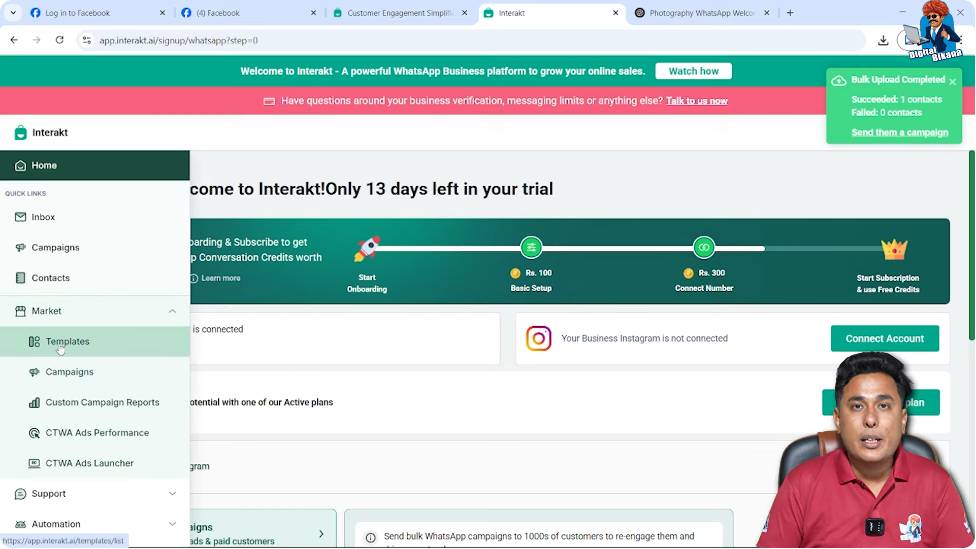
To begin creating a template, first log in to your Interakt dashboard.
Accessing the Market Section
On the left-hand side menu, move your cursor and click on the Market option.
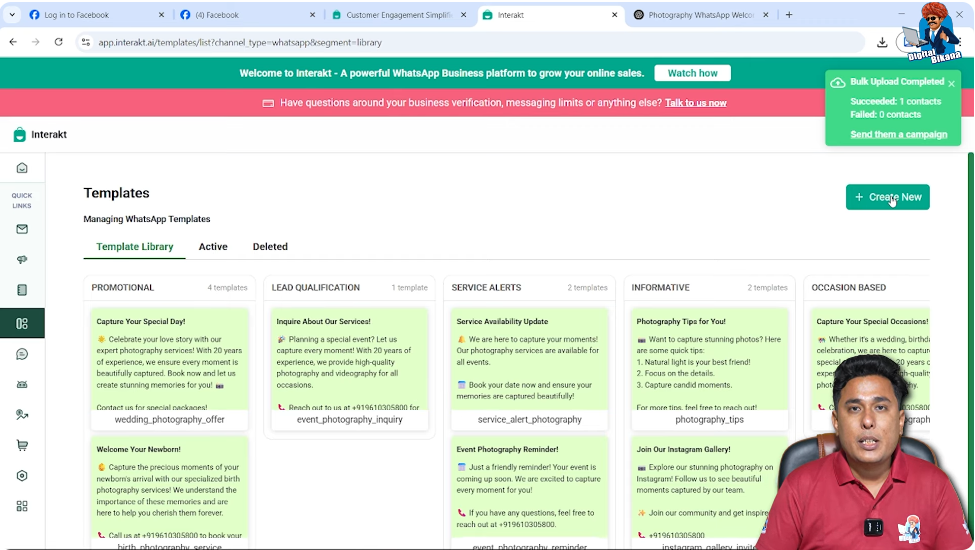
Opening the Templates Area
Inside the Market section, click on Templates.
This section shows all previously created templates and gives you the option to create a new one.
On the right-hand side, you will see a button labeled Create New Template. Click on this button to begin the template creation process.
Step 2: Creating a New Marketing Template
Once you click on Create New Template, you need to define the basic details of your template.
Naming the Template
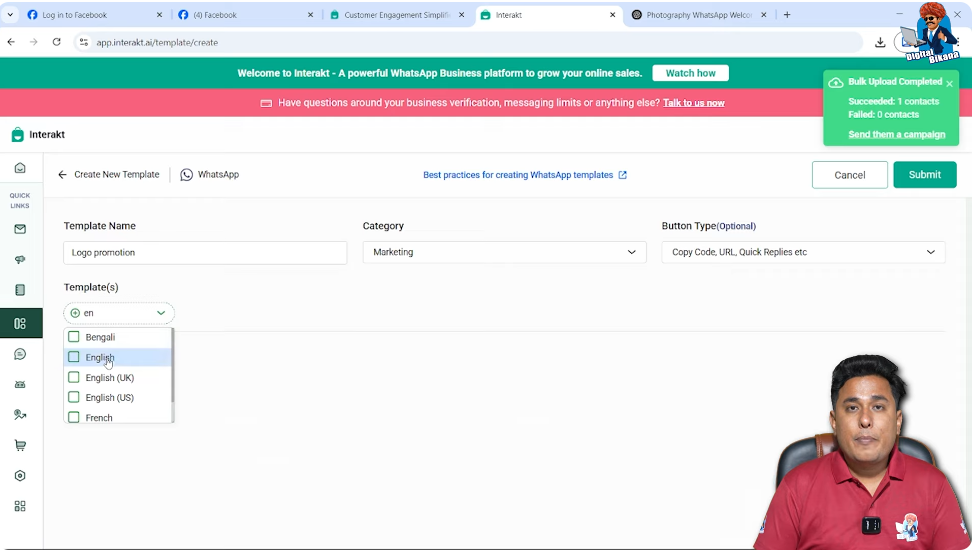
Enter a suitable template name.
In this case, the template name is set as Logo Promotion.
The template name is for internal identification and helps you recognize the template later when sending campaigns.
Selecting the Template Category
Under the Category option, select Marketing.
This is important because the template is intended for promotional messaging.
Choosing Button Types
Under the Buttons section, Interakt allows you to add different button types such as:
- Copy Code
- URL
- Quick Reply
These buttons improve user interaction and help guide users toward actions like visiting a website, calling a number, or starting a chat.
Selecting the Language
Choose English as the language.
If you are creating a Hindi message, you must select Hindi instead. The language selection must match the language used in the message content.
Step 3: Selecting the Message Format
After setting the basic details, you need to choose the format of your message.
Available Message Formats
Interakt provides the following options:
- Text
- Image
- Video
- Document
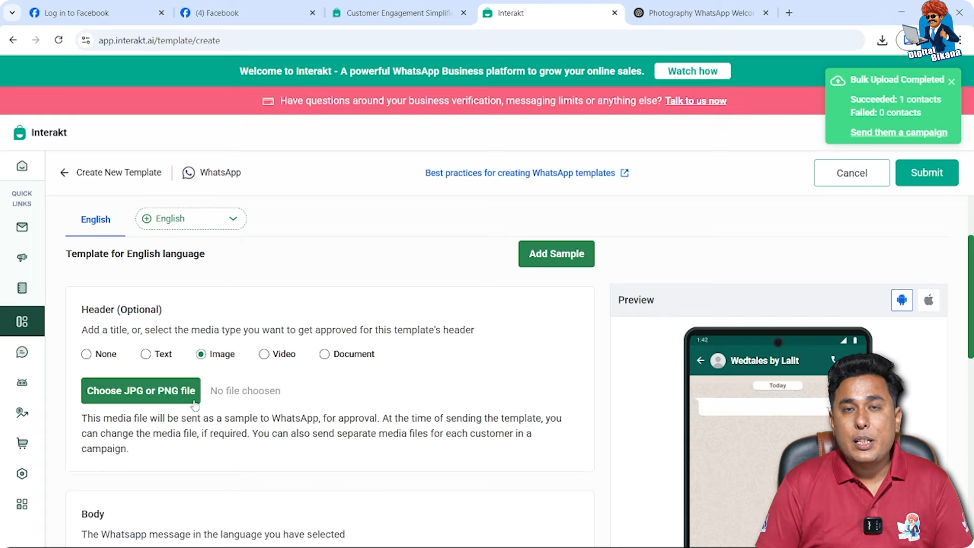
In this case, an image-based marketing template is being created.
Uploading an Image
Select Image and choose a JPG or PNG file from your system.
This image can be a banner or promotional visual that will appear at the top of the WhatsApp message.
Step 4: Writing the Message Body
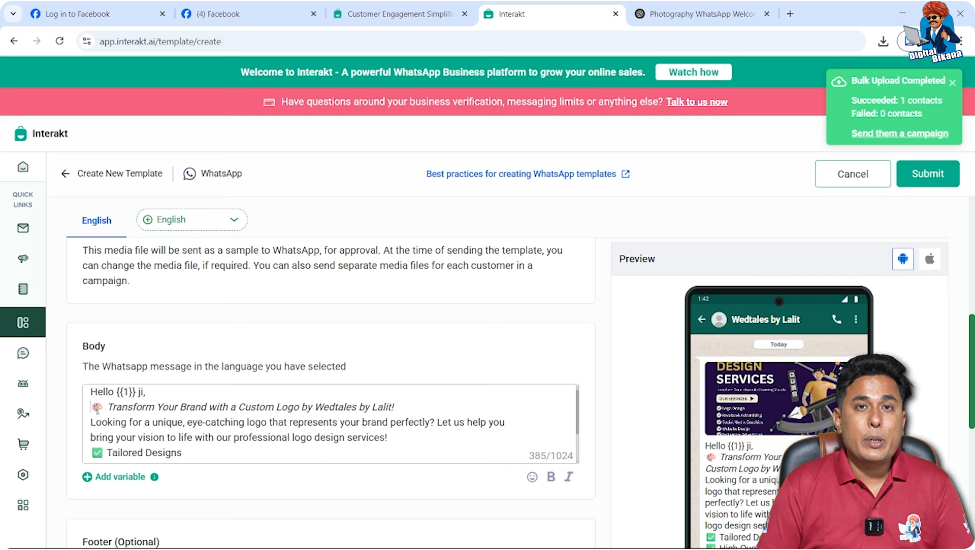
After uploading the image, scroll down to the Body section where the main message text is written.
Adding a Personalized Greeting
Start by typing Hello, then give a space and click on Add Variable.
This variable is used to personalize the message by inserting the recipient’s name.
After adding the variable, write Ji, followed by a comma.
Press Enter to move to the next line.
Adding the Main Message Content
Now type or paste the main message content that you want to send.
The message content is already prepared, so it is pasted directly into the body section.
This completes the core message structure.
Step 5: Adding Sample Value for Variables
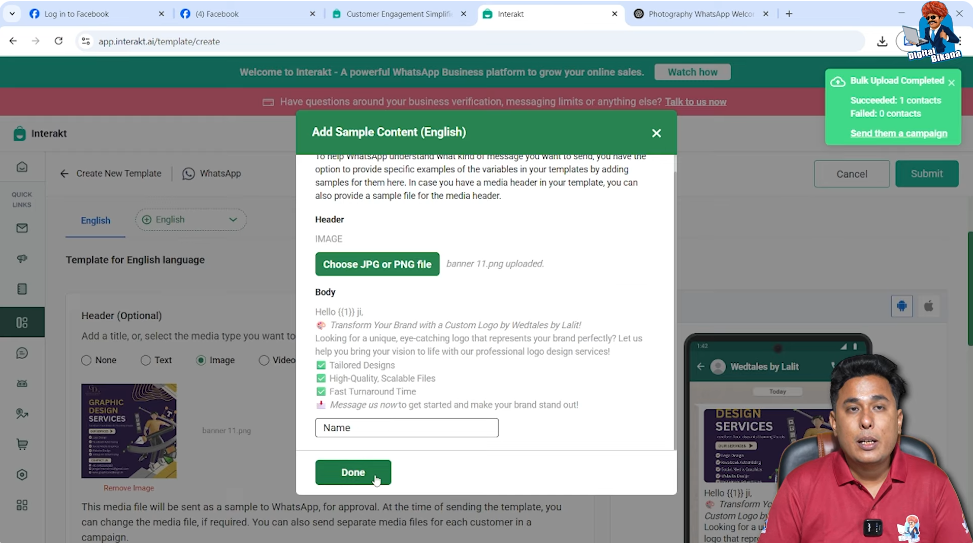
Whenever a variable is used, WhatsApp requires a sample value to understand how the message will appear.
Adding Sample Content
Scroll up and click on Add Sample.
You will be asked what content should replace Variable 1.
Here, enter Name, which represents the customer’s name.
This step is mandatory if variables are used in the message.
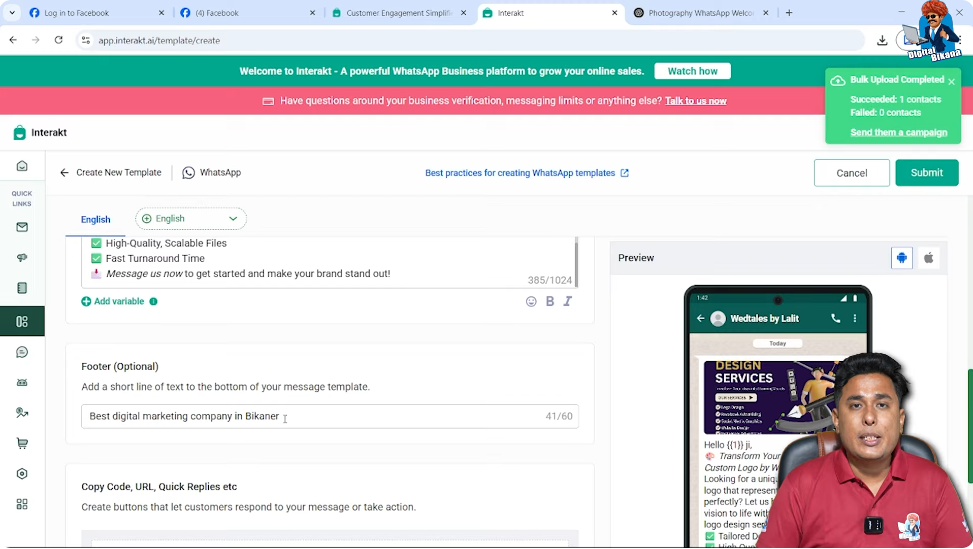
Step 6: Adding Footer Text
Below the message body, you will find the Footer (Optional) section.
Writing Footer Content
In the footer, enter:
Best Digital Marketing Company in Bikaner
The letter B in Bikaner is capitalized because it is a city name.
Understanding Footer Display
Footer text appears at the bottom of the message in small, grey-colored text.
It looks subtle, professional, and adds credibility to the message.
You can see the footer preview in the message preview panel.
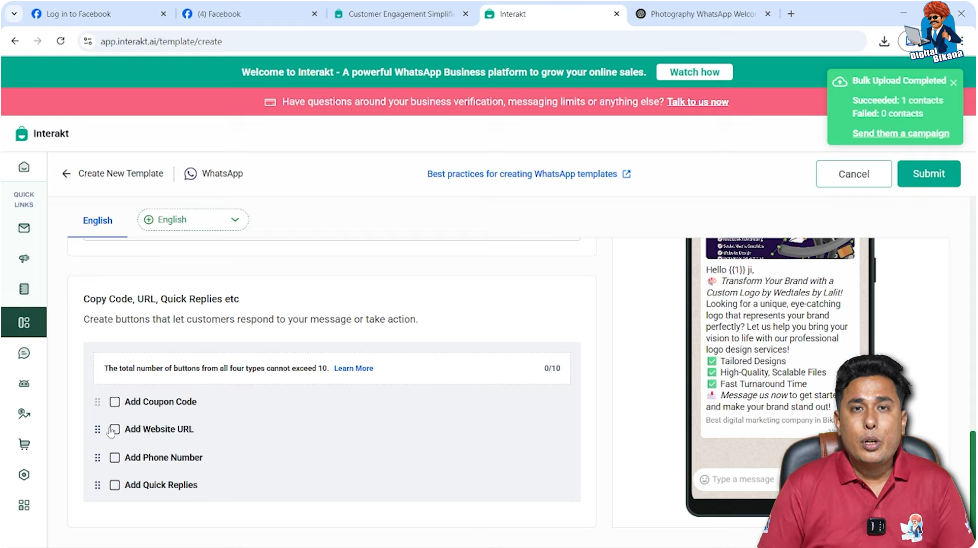
Step 7: Adding Buttons to the Template
Buttons help users take action directly from the message.
Adding a Website URL Button
If you are selling products or services through a website, you can add a URL button.
Enter your website URL and set the button text as Visit Website.
This button will redirect users to your website when clicked.
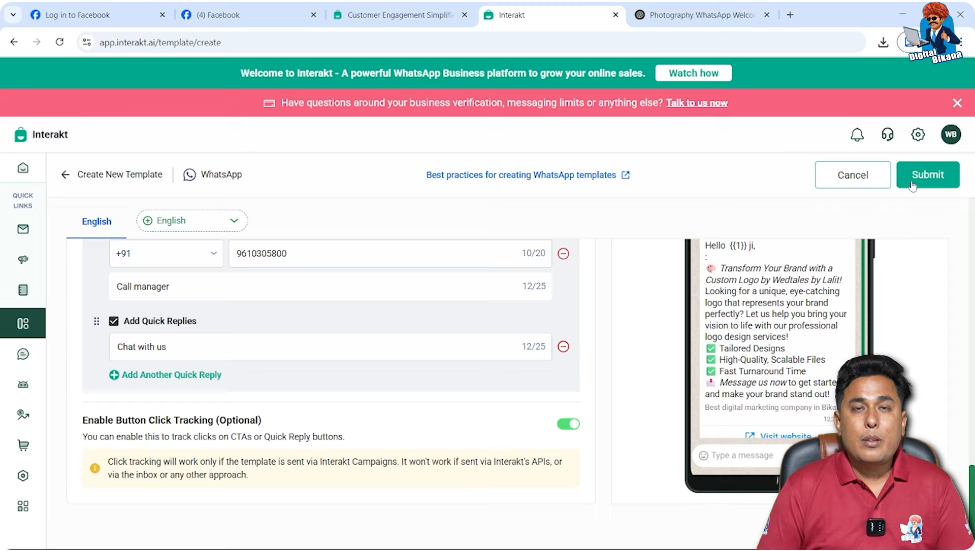
Adding a Call Button
Next, add a Phone Number button.
Enter your contact number and set the button text as Call Manager.
When users click this button, their phone dialer opens automatically with the number filled in.
Adding a Quick Reply Button
Under Quick Reply, add the text Chat With Us.
This button is designed to start the chatbot journey when clicked.
Step 8: Enabling Button Click Tracking
Enable Button Click Tracking.
This feature allows you to track how many users clicked on:
- Website buttons
- Call buttons
- Quick reply buttons
Tracking helps in understanding user behavior and campaign performance.
Step 9: Submitting the Template for Approval
After completing all sections, click Submit.
Handling Automatic Suggestions
Interakt may suggest adding multiple FAQ-style buttons automatically.
When previewed, these extra buttons make the message cluttered and unattractive.
To avoid this:
- Select all suggested buttons
- Uncheck them
- Click Confirm
Now click Submit again.
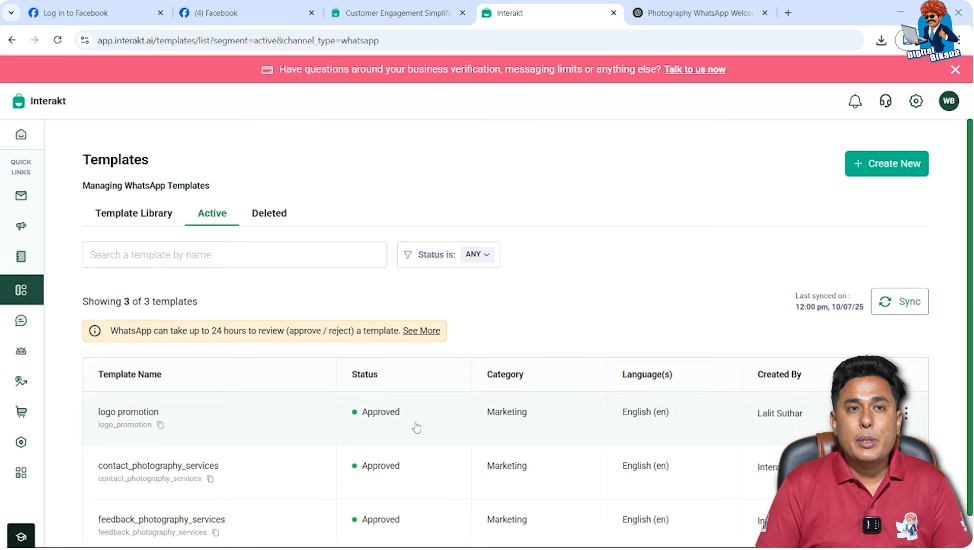
Step 10: Template Approval Process
After submission, the template enters the approval process.
Understanding Approval Status
Initially, the template may show Pending status.
Approval can take a few seconds, minutes, or sometimes hours.
Once approved, the status changes to Approved.
You can refresh the page to check the latest status.
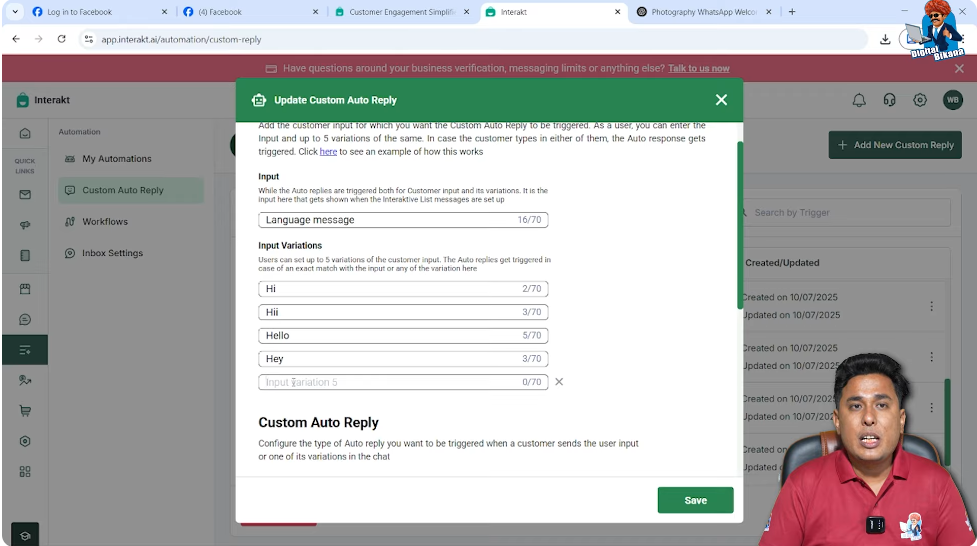
Step 11: Connecting the Template With Custom Auto Reply
After the template is approved, it must be linked with the existing chatbot journey.
Opening Custom Auto Reply Section
Go to Automation → Auto Reply → Custom Auto Reply.
Identifying the Language Message
Find the Language Message created earlier.
This is where the input name helps identify the correct message easily.
Adding “Chat With Us” as an Input Variation
In the input variations where greetings like “Hi” are listed, add Chat With Us as well.
This ensures that when a user clicks the Chat With Us button from the template, the chatbot immediately asks for language selection and restarts the journey.
Click Save.
How the Template and Chatbot Work Together
Once everything is connected:
- The marketing template is sent to users
- Users see the image, message, footer, and buttons
- Clicking Chat With Us triggers the chatbot journey
- Language selection appears again
- The automated conversation continues smoothly
This creates a seamless experience between marketing and automation.
Final Summary
In this article, we learned how to create a marketing template in WhatsApp Business API using Interakt.
The complete process included:
- Navigating to the template section
- Creating a marketing template
- Adding images, variables, and footer text
- Configuring buttons like website, call, and quick reply
- Submitting the template for approval
- Connecting the template with a custom auto-reply journey
Conclusion
Templates are a crucial part of WhatsApp Business API marketing. A well-designed template not only looks professional but also helps guide users into an automated journey without confusion.
By carefully setting up the template and linking it with custom auto replies, businesses can run effective marketing campaigns and start conversations automatically without manual effort.
In the next step, marketing campaigns can be sent using this approved template to reach uploaded contacts efficiently.
Related Posts