In this article, we are going to learn how to connect Facebook Pixel (Meta Pixel) with your Meta ad account or Facebook ad account. Connecting the Meta Pixel with your ad account is a very important step if you want to track website visitors properly and use that data for running ad campaigns.
Many users create a Meta Pixel in Events Manager but forget to connect it with their ad account. Without this connection, the pixel cannot be used effectively for tracking, retargeting, or creating website-based custom audiences.
This article explains the complete process of connecting an already created Meta Pixel with an ad account using Events Manager and Meta Business Suite settings.
Understanding Why Meta Pixel Must Be Connected to an Ad Account
Meta Pixel is a tracking code that collects website data. However, for this data to be usable in ad campaigns, the pixel must be linked to the correct ad account.
By connecting Meta Pixel with your ad account, you allow:
- Website tracking data to flow into ads
- Creation of website-based custom audiences
- Use of pixel data in campaign optimization
Without this connection, the pixel exists but cannot be fully utilized.
Prerequisites Before Connecting Meta Pixel
Before connecting Meta Pixel to an ad account:
- The Meta Pixel must already be created
- You must have access to Events Manager
- You must have access to Meta Business Suite settings
This article assumes that the Meta Pixel has already been created in Events Manager, as discussed in previous articles.
Opening Events Manager
The first step is to open Events Manager.
You can visit Events Manager using:
If you already know how to access Events Manager, you can directly open it. Events Manager is where all pixel-related settings are managed.

Locating the Meta Pixel in Events Manager
Step 1: Open Data Sets in Events Manager
Find Your Pixel Code
Inside Events Manager:
- Go to Data Sets
- Here you will see the Meta Pixel that you created earlier
This section lists all tracking data sources connected to your business.

Step 2: Open Pixel Settings
Access Pixel Configuration
Once you locate your Meta Pixel:
- Click on the pixel
- Click on Settings
This opens the configuration panel for your pixel.
Finding the Option to Connect Ad Account
Step 3: Scroll to Share With Ad Account
Locate Sharing Option
Inside pixel settings:
- Scroll down
- Look for the option Share with an Ad Account
This option is used to link the pixel with an ad account.
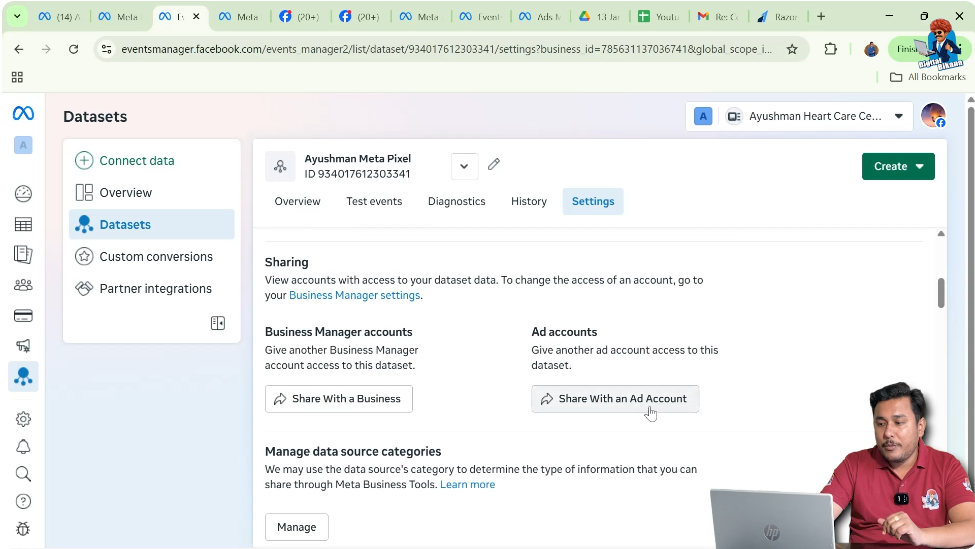
Step 4: Click on Share With an Ad Account
Redirect to Business Settings
As soon as you click on Share with an Ad Account:
- You are automatically redirected to Meta Business Suite settings
This happens because ad account connections are managed at the business level.

Understanding Meta Business Suite Settings Page
The page you land on is the Meta Business Suite Settings page.
If you have watched previous videos, you may already be familiar with this page, as it is used for:
- Managing assets
- Managing data sources
- Connecting business tools
Navigating to Data Sets and Pixels
Step 5: Open Data Sources Section
Locate Pixel in Business Settings
On the Meta Business Suite settings page:
- Go to Data Sources
- Click on Data Sets
- Select Pixels
Here, you will again see the Meta Pixel that you created in Events Manager.
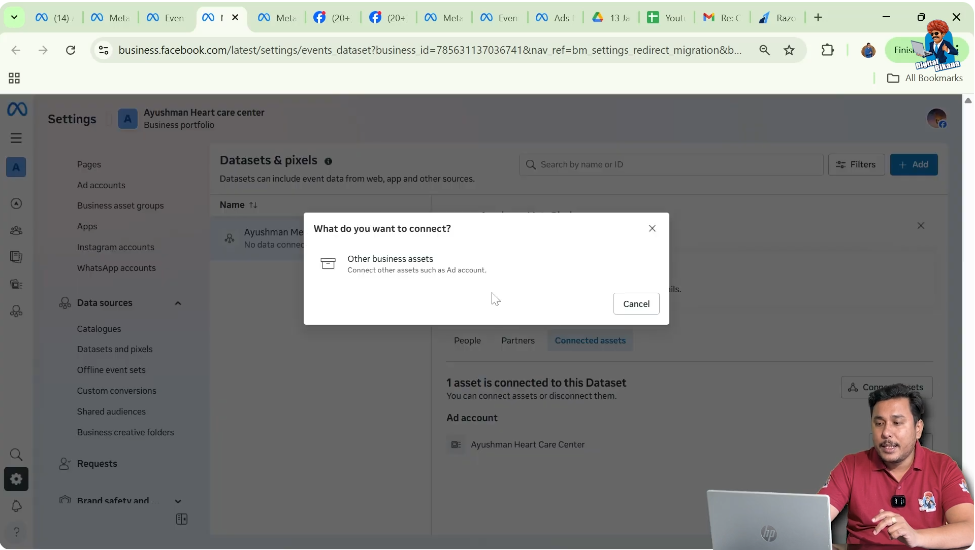
Connecting the Ad Account to Meta Pixel
Step 6: Open Connected Assets
Check Existing Connections
Click on your Meta Pixel and then open Connected Assets.
If your ad account is already connected:
- It will appear here
If not:
- You need to connect it manually

Step 7: Click on Connect Assets
Add Business Asset
If your ad account is not connected:
- Click on Connect Assets
- Select Other Business Assets
This allows you to add an ad account.
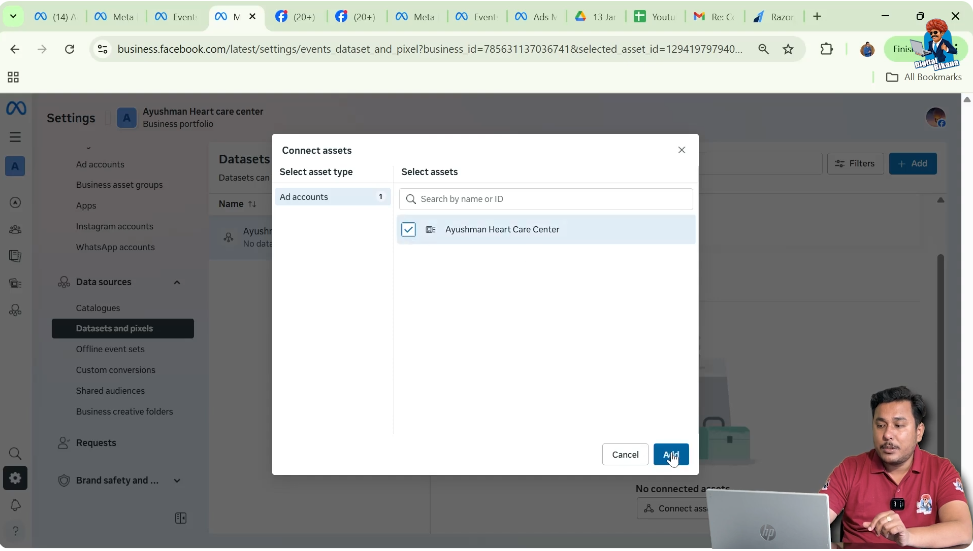
Step 8: Select Ad Account
Choose Correct Ad Account
From the list of available ad accounts:
- Select the ad account you want to connect
- Click on Add
This action links the selected ad account to your Meta Pixel.
Completion of Pixel and Ad Account Connection
Once you click add:
- Your Meta Pixel gets connected to the selected ad account
- The connection is applied immediately
Now the pixel can be used inside that ad account for tracking and targeting.
What Happens After Connecting Meta Pixel With Ad Account
After successful connection:
- Pixel data becomes available in Ads Manager
- Website-based custom audiences can be created
- Pixel events can be used for optimization
This connection is essential for running effective website-based campaigns.
Common Scenarios Explained
If Ad Account Is Already Connected
If your ad account is already connected:
- You will see it under connected assets
- No further action is required
If Ad Account Is Not Connected
If the ad account is not connected:
- You must manually connect it using the steps above
Without this step, pixel data will not flow into ads.
Why This Step Is Often Missed
Many users:
- Create the Meta Pixel
- Install it on the website
- Forget to connect it with the ad account
This leads to confusion when pixel data does not appear in Ads Manager.
Importance of Connecting Pixel Before Running Ads
Connecting Meta Pixel to your ad account ensures:
- Accurate website tracking
- Proper audience creation
- Better campaign performance
Without this connection, Meta Pixel cannot function as intended.
Meta Pixel and Ad Account Connection Explained in Simple Words
In simple terms:
- You created a Meta Pixel
- You open its settings
- You connect it to your ad account
- Now the pixel can be used in ads
This step completes the pixel setup process.
Final Checklist for Pixel Connection
Before moving forward, ensure that:
- Meta Pixel is created
- Pixel is visible in Events Manager
- Ad account is connected under connected assets
If all three are done, your setup is complete.
Final Conclusion
Connecting Facebook Pixel (Meta Pixel) with your Meta ad account or Facebook ad account is a crucial step in the tracking and advertising process. By opening Events Manager, accessing pixel settings, and connecting the ad account through Meta Business Suite settings, you enable your pixel to work properly with your ads.
Once connected, the Meta Pixel can track website activity, help create website-based custom audiences, and improve ad campaign performance. This step ensures that all pixel data is correctly linked to your ad account and ready to be used for future campaigns.
Related Posts