In this session, we learn how to upload contacts in Interakt for WhatsApp Business API so that bulk messaging campaigns can be executed smoothly. Contact uploading is a mandatory step before running any promotional or informational WhatsApp campaign. Without contacts properly uploaded and tagged, bulk messaging is not possible. Interakt provides a simple and structured way to upload contacts in bulk using a sample file. This article explains the complete process step by step, starting from accessing the Contacts section to successfully uploading and tagging contacts for future campaigns.
Why Contact Upload Is Important in WhatsApp Business API
Before sending bulk messages through WhatsApp Business API, businesses must upload their contacts into the system. These contacts act as the audience base for campaigns.
Uploading contacts correctly allows you to:
- Send bulk promotional or informational messages
- Organize contacts using tags
- Target specific user groups during campaigns
- Maintain proper contact records inside Interakt
How to Upload Contacts in WhatsApp Business API for Bulk Messaging?
Step 1: Logging in to Interakt Dashboard
Before starting the contact upload process, make sure you are logged in to your Interakt account.
Once logged in, you will see the main dashboard. From here, all WhatsApp Business API-related actions such as contacts, campaigns, automation, and messaging can be managed.

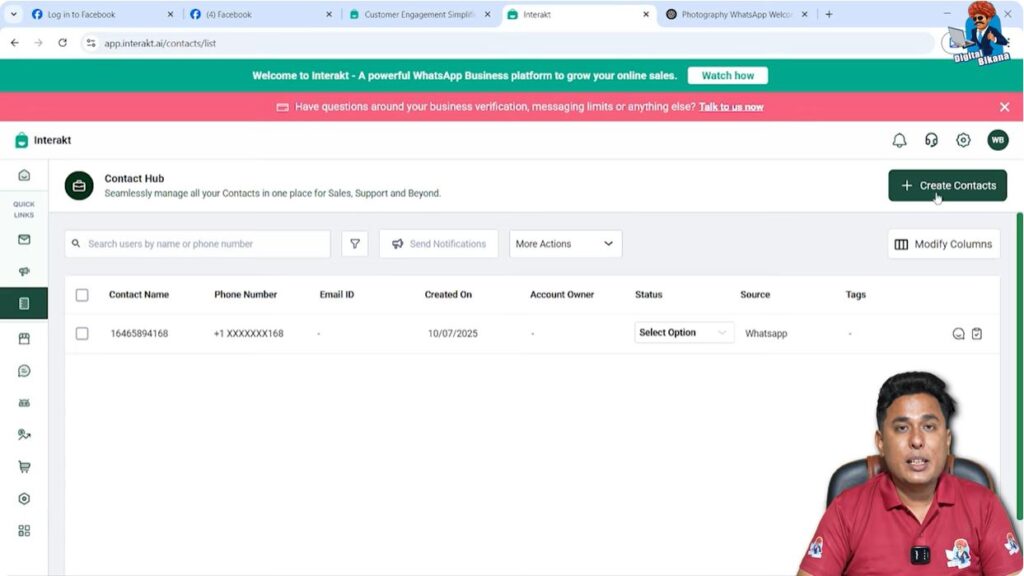
Step 2: Accessing the Contacts Section
Navigating Through the Left Sidebar
On the left side of the Interakt dashboard, you will find multiple options.
Locate and click on the Contacts option.
This section contains all uploaded contacts and allows you to add new contacts either individually or in bulk.

Step 3: Choosing Bulk Upload Instead of Single Contact Entry
Inside the Contacts section, you will see an Add Contacts button.
At this stage, it is important to understand that:
- Adding contacts one by one is time-consuming
- Bulk upload is the preferred and efficient method
Click on Add Contacts to proceed with bulk uploading.
Step 4: Downloading the Sample File
Why the Sample File Is Necessary
Interakt provides a predefined sample file to ensure data is uploaded in the correct format.
Downloading the File
- Click on Download Sample File
- Save the file to your system
- Open the downloaded file
This file contains predefined columns such as name, phone number, country code, and other optional fields.

Step 5: Cleaning the Sample File Data
Removing Pre-filled Sample Data
Once the file is opened:
- Delete all existing sample entries
- Remove unnecessary rows filled with example data
- Keep only the column headers intact
This ensures there is no confusion or incorrect data during upload.

Step 6: Entering Contact Information
Filling Required Fields
Now start entering your own contact data.
Name Column
- Enter the contact name (example: Lalit Kumar)
- If names are not available, you may enter a sample name or leave it blank
Phone Number Column
- Enter the mobile number correctly
- Do not add spaces or special characters
Country Code Column
- Enter the country code
- For India, use 91
Optional Fields
If email IDs or other details are not available:
- Leave those columns empty
- Do not enter random or incorrect information

Step 7: Uploading Large Contact Lists
Uploading Multiple Contacts at Once
If you have a large list of contacts (for example, 500, 1,000, or 10,000 numbers):
- Paste names into the Name column
- Paste mobile numbers into the Phone Number column
- Paste country codes into the Country Code column
If names are unavailable:
- Use a common placeholder name
- Or leave the name field blank
Once all data is entered correctly, save the file.

Step 8: Uploading the File in Interakt
Returning to the Interakt Dashboard
After saving the file:
- Go back to the Interakt dashboard
- Click on the Upload button

Selecting the File
- Choose the edited file from your system
- Upload the file into Interakt
Once uploaded, Interakt will move to the tagging stage.

Understanding Tags in Interakt
What Are Tags?
Tags are labels used to categorize contacts.
They are extremely useful during campaign creation because they help you send messages to specific groups.
Examples of tags:
- Students
- Customers
- Leads
- Enquiries
Step 9: Adding Tags to Uploaded Contacts
Opening the Tag Section
After uploading the file:
- You will see a tag selection option
- Click on See More to view available tags
Creating a New Tag
If the required tag does not exist:
- Use the search box
- Type the tag name (example: Students)
- Click on Click here to create new tag – Students
The new tag will be created instantly.
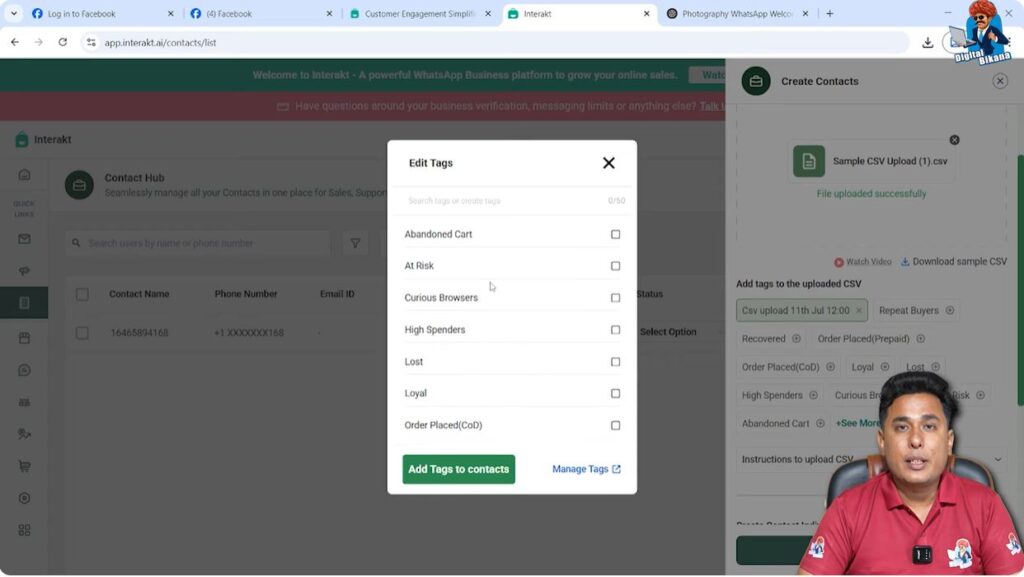
Step 10: Assigning the Tag to Contacts
Once the tag is created:
- Scroll down
- Select the newly created Students tag
- Click on Add Tag to Contacts
This ensures that all uploaded contacts are grouped under the selected tag.
Step 11: Submitting and Confirming the Upload
After assigning tags:
- Click on Submit
- Review the uploaded data once
- Click on Finish Upload
At this stage, the contact upload process is completed successfully.

Verifying Uploaded Contacts
Once the upload is finished:
- You will see the contact displayed in the Contacts list
- The assigned tag will be visible
- This confirms that the contact is ready for campaigns
Using the same process, you can upload any number of contacts depending on your requirements.
Best Practices for Contact Upload
Maintain Data Accuracy
- Ensure phone numbers are correct
- Avoid extra spaces or symbols
Use Tags Strategically
- Create meaningful tags
- Use different tags for different campaigns
Avoid Duplicate Uploads
- Upload contacts only once
- Use tags instead of re-uploading the same numbers
Use Case of Uploaded Contacts
Once contacts are uploaded and tagged, you can:
- Run bulk WhatsApp campaigns
- Send promotional messages
- Send announcements or updates
- Segment users based on tags
This structured approach improves campaign performance and user targeting.
Conclusion
In this session, we learned how to upload contacts in Interakt for WhatsApp Business API bulk messaging. The process included accessing the Contacts section, downloading and editing the sample file, uploading contact data, creating and assigning tags, and completing the upload successfully.
This method is the correct and recommended way to prepare contacts for WhatsApp bulk campaigns using Interakt. By following these steps carefully, businesses can ensure smooth campaign execution and better audience management.
Related Posts