Location targeting is one of the most important components of any Facebook ad campaign. Whether you are targeting a single city or multiple regions, selecting the correct geographic locations ensures that your ads reach the right audience.
When advertisers need to target multiple cities, postal codes, countries, or regions, entering each location manually can become time-consuming. To solve this problem, Facebook Ads Manager provides a feature called Add Location in Bulk at the ad set level.
In this article, we will clearly explain what add location in bulk means in Facebook ads and how to use it effectively.
Understanding Where Location Targeting Is Available
Before learning about bulk location targeting, it is important to understand where location settings are configured in Facebook Ads Manager.
Facebook ads are structured into three levels:
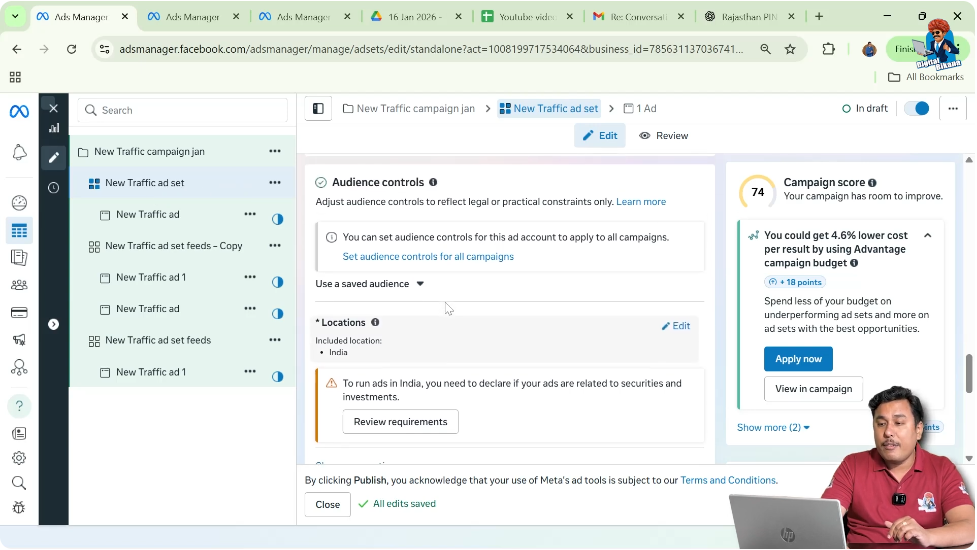
Location targeting is always done at the ad set level, inside the Audience Control section.
This means you must navigate to the ad set level to manage geographic targeting.
What is Add Location in Bulk?
Add location in bulk refers to the feature that allows advertisers to enter multiple geographic locations at once instead of adding them one by one.
For example:
- If you want to run ads in 50 different cities,
- Or target multiple countries,
- Or add several postal codes,
You can use the bulk location feature to input all of them together.
This saves time and improves efficiency.
Manual Location Entry vs Bulk Entry
Normally, advertisers add locations manually by typing a city name and selecting it from the dropdown.
While this works for a few locations, it becomes inefficient when targeting many areas.
Bulk location entry allows you to:
- Add multiple cities at once
- Add multiple countries
- Add multiple postal codes
- Add multiple regions
All using a single input format.
Step 1: Go to Ad Set Level
Open the Audience Control Section
- Log in to Facebook Ads Manager.
- Create a new ad campaign or open an existing one.
- Navigate to the Ad Set level.
- Scroll to the Audience Control section.
This is where you will find the location targeting settings.
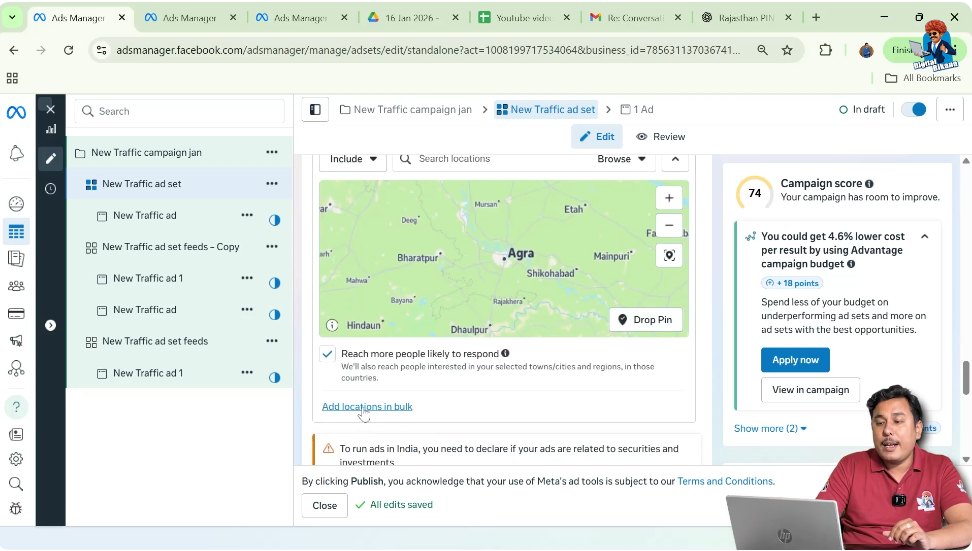
Step 2: Click on “Add Location in Bulk”
Access the Bulk Location Feature
Inside the Audience Control section:
- Locate the location targeting field.
- Click on the option Add Location in Bulk.
This opens a separate input window where you can enter multiple locations together.
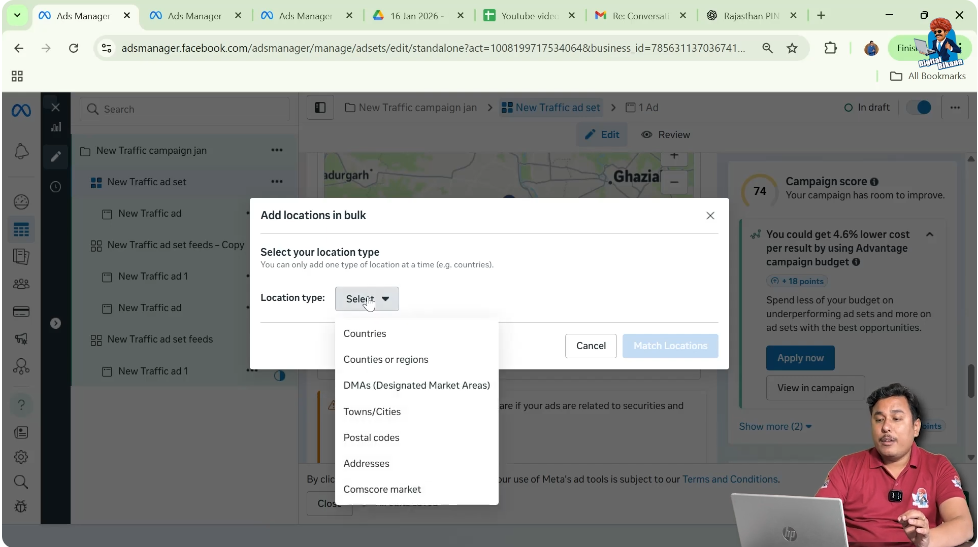
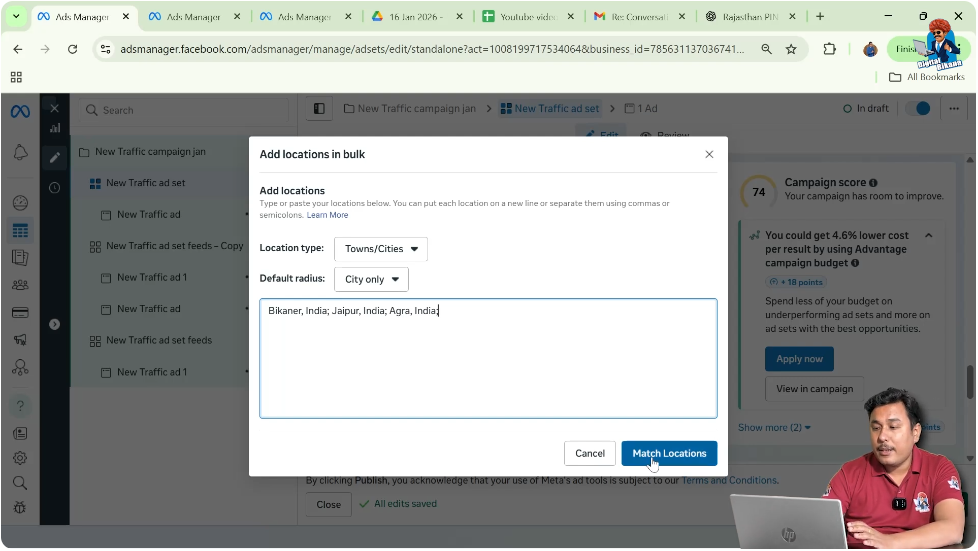
Available Location Types
When you click on Add Location in Bulk, Facebook asks you to select the location type.
The available location types include:
- Countries
- Counties or Regions (sometimes called States)
- Designated Market Areas (DMAs)
- Towns and Cities
- Postal Codes or Pin Codes
- Addresses
- ComScore Markets
Each type serves a specific geographic targeting purpose.
Step 3: Select the Location Type
Choose the Appropriate Geographic Category
If you want to add multiple cities:
- Select Towns and Cities.
If you want to add postal codes:
- Select Postal Codes.
If you want to target entire countries:
- Select Countries.
Choosing the correct type ensures accurate matching.
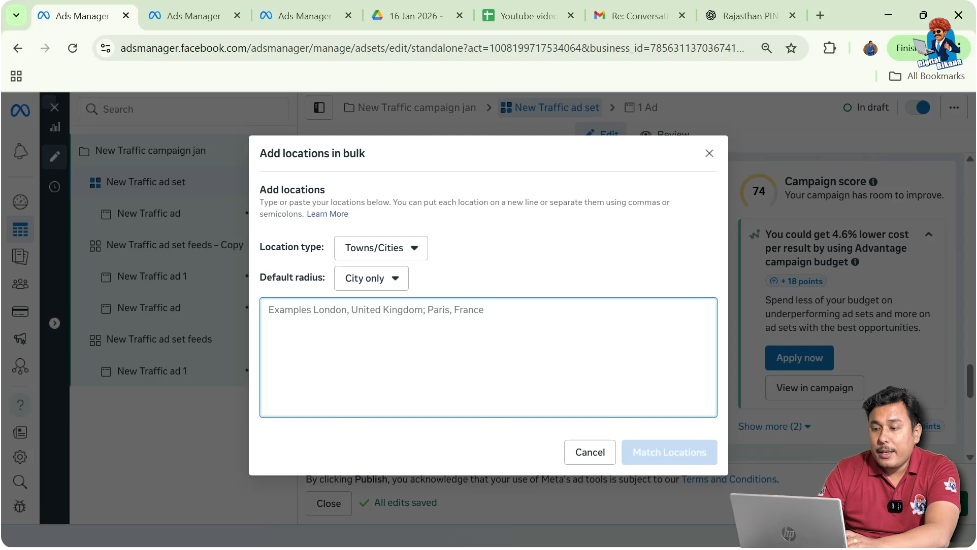
Understanding the Format for Bulk Entry
When adding cities in bulk, Facebook requires a specific format.
The required format is:
City Name, Country Name; City Name, Country Name; City Name, Country Name
Each city must:
- Be separated by a semicolon (;)
- Include the country name
- Follow the proper format
This ensures Facebook correctly matches the locations.
Step 4: Enter Locations in the Correct Format
Separate Cities Using Semicolons
For example:
City1, Country; City2, Country; City3, Country
Each entry must follow:
- City name
- Comma
- Country name
- Semicolon
Continue this pattern for all cities.
This allows you to add multiple cities at once.
Step 5: Click on “Match Locations”
Validate Entered Locations
After entering all cities or postal codes:
- Click on Match Locations.
- Facebook will process the entries.
- It will display all matched locations.
This step confirms whether the system recognizes your inputs correctly.
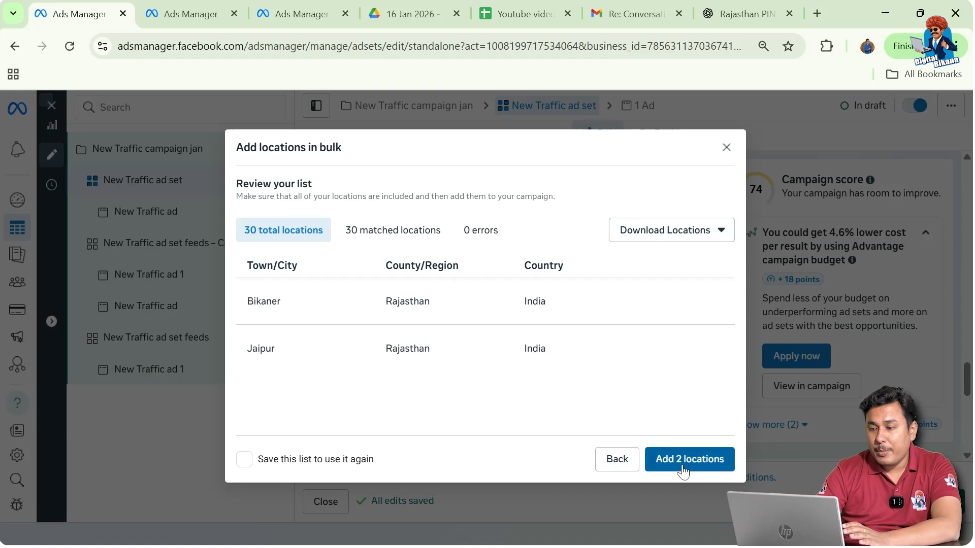
Reviewing Matched Locations
Once locations are matched, Facebook displays a list of results.
Sometimes, it may show:
- Exact cities
- Similar location names
- Addresses within those cities
You must carefully review the matched results.
Step 6: Remove Irrelevant Locations
Uncheck Unwanted Matches
Among the matched locations:
- Uncheck any irrelevant entries.
- Remove addresses if you only want cities.
- Ensure only the correct locations remain selected.
This ensures precise targeting.
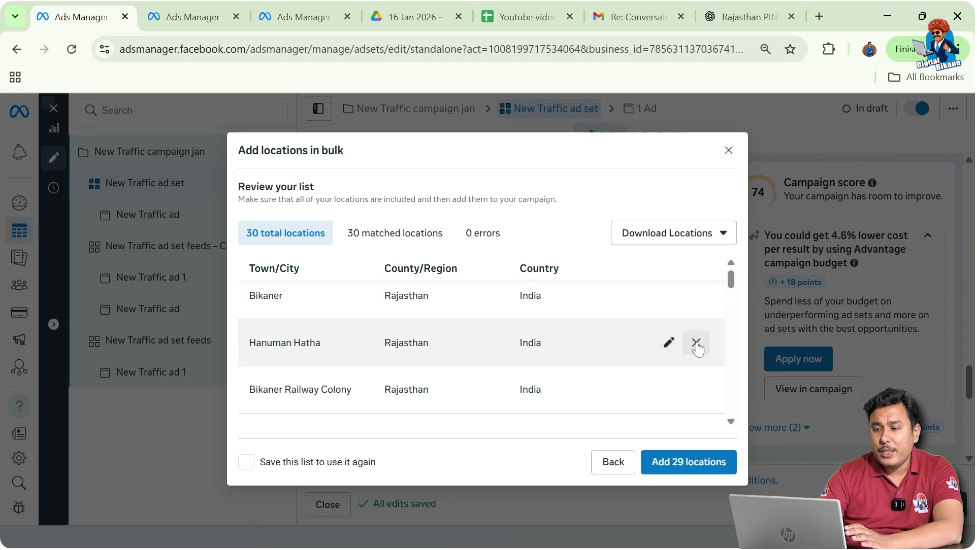
Step 7: Click on “Add to Location”
Confirm Bulk Location Selection
After reviewing and cleaning up the list:
- Click on Add to Location.
All selected cities or postal codes will now appear in your ad set targeting section.
You have successfully added locations in bulk.
Example Scenario
Suppose you want to run an ad campaign in:
- 50 cities
- 100 postal codes
- Multiple regions
Instead of typing each one manually, you:
- Select the location type
- Enter all names in the required format
- Match locations
- Remove irrelevant results
- Add them at once
This simplifies the process significantly.
Why Bulk Location Targeting Is Useful
Bulk location targeting is useful because it:
- Saves time
- Reduces manual effort
- Minimizes errors
- Allows large-scale geographic targeting
It is especially helpful for businesses targeting multiple service areas.
Common Mistakes to Avoid
While using bulk location targeting, avoid these mistakes:
- Using incorrect format
- Forgetting semicolons
- Not including country names
- Selecting the wrong location type
- Adding irrelevant matched results
Always double-check before confirming.
Difference Between Cities and Addresses
When matching locations, Facebook may show:
- Cities
- Specific addresses
If your goal is city-level targeting, remove specific addresses.
Only keep entries relevant to your campaign objective.
Final Explanation in Simple Words
To use add location in bulk:
- Go to ad set level.
- Open audience control.
- Click Add Location in Bulk.
- Select location type.
- Enter locations in correct format.
- Click Match Locations.
- Remove irrelevant matches.
- Click Add to Location.
That’s all.
Conclusion
Add location in bulk in Facebook ads is a powerful feature that allows advertisers to add multiple geographic locations at once. Instead of entering each city or postal code manually, advertisers can use the bulk location feature to input multiple entries in a specific format.
By selecting the correct location type, entering cities or postal codes in the required format, matching locations, removing irrelevant results, and confirming the selection, advertisers can efficiently target multiple areas in a single ad set.
This feature saves time, reduces manual errors, and enables large-scale geographic targeting for Facebook ad campaigns.
Related Posts