Hello friends, in this article we are going to understand how to verify phone number in an Ads Manager ad account in complete detail. Phone number verification is an important step in Ads Manager because it helps Meta confirm the authenticity of the ad account and adds an extra layer of trust and security. This article explains the full process step by step, exactly as it happens inside Ads Manager.
Understanding Phone Number Verification in Ads Manager
Before moving into the steps, it is important to understand what phone number verification means in Ads Manager and why it exists.
Phone number verification in an ad account is used by Meta to:
- Confirm that the ad account is linked to a real and reachable phone number
- Improve account security
- Reduce misuse of ad accounts
- Strengthen account credibility
Once a phone number is verified, it becomes part of the account’s trusted information.
Where Phone Number Verification Happens in Ads Manager
Phone number verification can only be done from one specific place in Ads Manager.
That place is the Account Overview section.
You cannot verify your phone number:
- From campaign level
- From ad set level
- From ad creative level
The option is available only inside Account Overview of the ad account.
How to verify phone number in Facebook Ad Account?
Step 1: Logging in to Ads Manager
The first step is to log in to your Ads Manager.
Make sure:
- You are logged in with the correct Facebook account
- The account has access to the ad account you want to verify
Once logged in, you will see the Ads Manager dashboard.
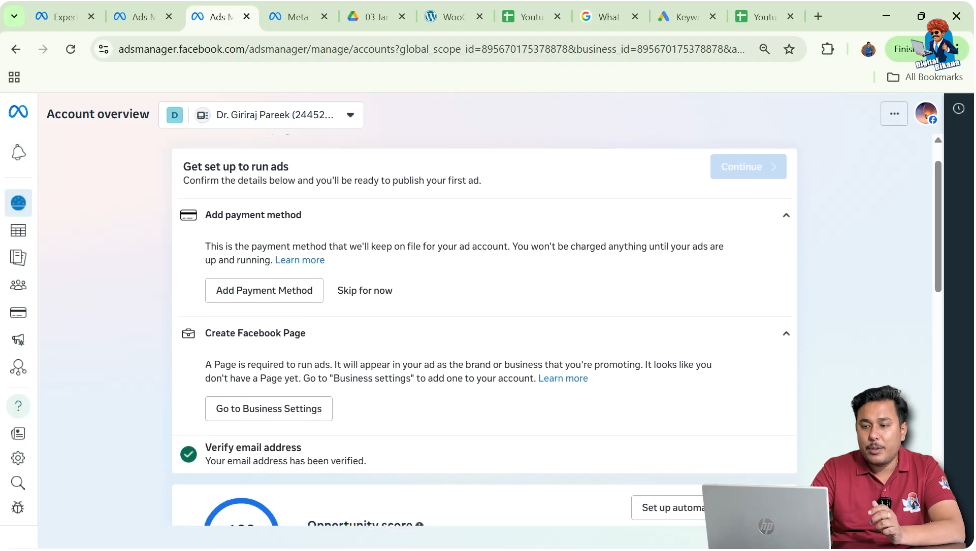
Step 2: Opening the Account Overview Section
Inside Ads Manager, look at the left-side menu.
Here, you will find an option called Account Overview.
Click on Account Overview.
This will open a screen that shows all important details related to your ad account.

Understanding the Account Overview Section
The Account Overview section displays critical information about your ad account, such as:
- Account details
- Email verification status
- Phone number verification status
- Ad account spending
- Payment method
This section is used to manage and verify essential account-level information.
Step 3: Checking Phone Number Verification Status
Inside the Account Overview section, look carefully at the information displayed.
If your phone number is not verified, you will see an option related to:
- Verify phone number
This option usually appears just before the ad payment method section.
If your phone number is already verified, this option will not appear.
Why the Phone Number Verification Option May Not Be Visible
In many cases, users get confused because they do not see the phone number verification option.
This happens because:
- The phone number is already verified
When a phone number is verified:
- Meta Ads Manager hides the verification option
- Only the verified status is shown
This is completely normal behavior.
Step 4: Checking Another Ad Account (If Required)
If you manage multiple ad accounts and do not see the phone number verification option in one account, you can check another ad account.
To do this:
- Switch to another ad account
- Open Account Overview again
Sometimes, the screen may take a few seconds to load. This delay is normal and does not mean your internet connection is slow.

Understanding Loading Delays in Account Overview
When opening Account Overview:
- The page may take some time to load
- This usually happens if multiple ad accounts are linked
This delay is system-related and not an issue with your device or network.
Step 5: Identifying Verified Phone Number Status
If the phone number is already verified, you will see:
- Verified email status
- Verified phone number status
In this case:
- No further action is required
- Your ad account already meets the phone verification requirement
Step 6: When the Phone Number Verification Option Appears
If your phone number is not verified, the Account Overview section will show:
- An option to verify phone number
This is the point where you can start the verification process.
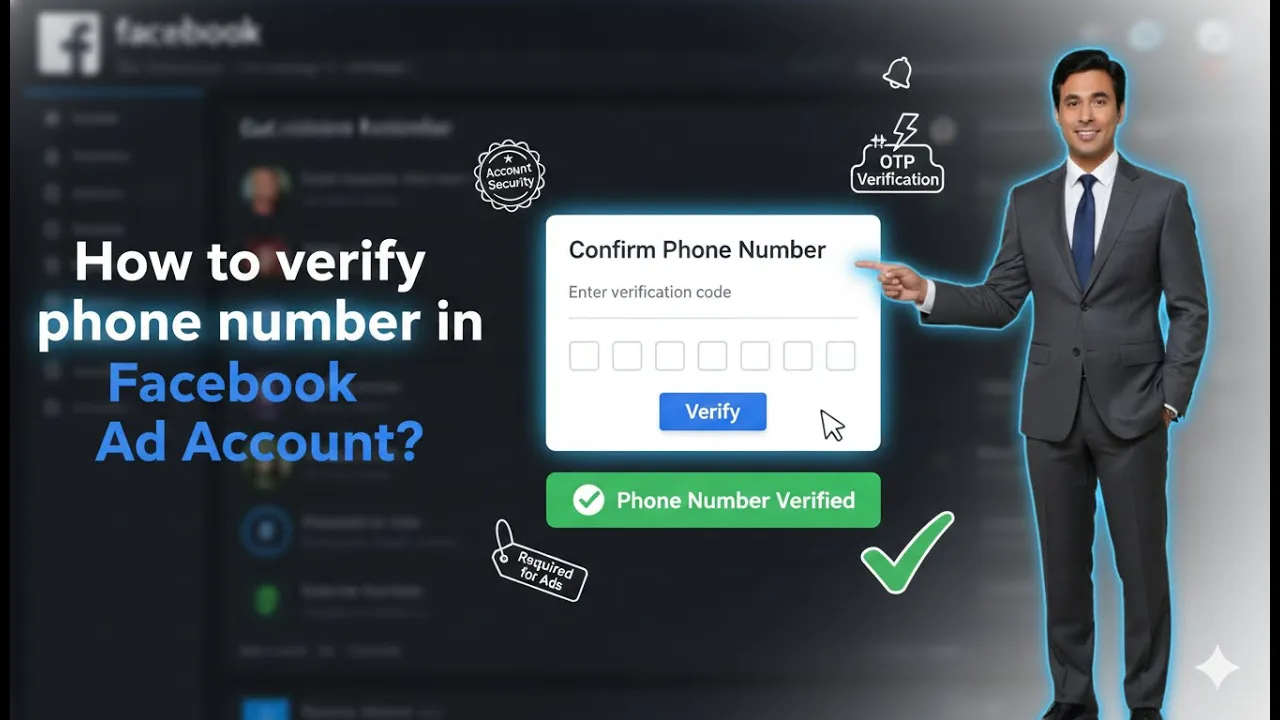
Step 7: Entering Your Phone Number
When the verification option appears:
- Click on Verify phone number
- Enter your phone number carefully
Make sure:
- The phone number is correct
- The number is active
- You have access to receive messages on that number
Step 8: Receiving OTP from Meta
After entering your phone number:
- Meta sends an OTP (One-Time Password) to that phone number
The OTP is usually sent via:
- SMS
This step ensures that the phone number belongs to you.
Step 9: Entering the OTP for Verification
Once you receive the OTP:
- Enter the OTP in the verification field
- Submit the code
If the OTP is correct:
- The phone number gets verified immediately
Step 10: Phone Number Successfully Verified
After successful OTP verification:
- The phone number is marked as verified
- The verification option disappears
- The verified status is shown in Account Overview
From this point onward, the phone number remains verified unless changed manually.
Important Points About Phone Number Verification
Verification Is Account-Specific
Phone number verification applies to:
- The specific ad account
- Not necessarily all ad accounts
If you manage multiple ad accounts, each account may have its own verification status.
Verification Option Appears Only Once
Once a phone number is verified:
- The verification option will not appear again
- Only the verified status is shown
This avoids unnecessary repetition.
OTP Is Mandatory
Phone number verification cannot be completed without OTP verification.
Meta uses OTP to:
- Prevent fake numbers
- Confirm ownership
Common Reasons Why Users Cannot Find the Verification Option
Some common reasons include:
- Phone number already verified
- Looking in the wrong section
- Not checking Account Overview
- Page still loading
Always remember:
👉 Phone number verification is available only in Account Overview.
Why Phone Number Verification Is Important
Phone number verification helps:
- Improve account security
- Reduce risk of ad account issues
- Build trust with Meta systems
- Ensure smoother ad operations
Verified accounts are generally considered more reliable.
Difference Between Email and Phone Verification
Ads Manager supports:
- Email verification
- Phone number verification
Both serve different purposes:
- Email verification confirms account ownership
- Phone verification adds an extra layer of authentication
Having both verified strengthens the account profile.
What Happens After Phone Number Verification
Once your phone number is verified:
- No additional setup is required
- The account continues to function normally
- Ads can run without interruption
There is no need to re-verify unless you change the phone number.
Troubleshooting Phone Number Verification Issues
OTP Not Received
If OTP is not received:
- Wait for a few seconds
- Ensure the phone number is correct
- Check network connectivity
Option Not Visible
If the verification option is not visible:
- The phone number is likely already verified
- Check the verified status displayed
Best Practices for Phone Number Verification
- Always verify a valid and active phone number
- Use a number you can access anytime
- Avoid changing the number frequently
This helps maintain account stability.
Final Understanding
Phone number verification in Ads Manager is a simple yet important process. It can only be done from the Account Overview section and requires OTP confirmation. If the phone number is already verified, the option will not appear, which means no action is required.
Final Conclusion
Verifying your phone number in an Ads Manager ad account is a straightforward process that enhances account security and trust. By navigating to Account Overview, checking the verification status, and completing OTP verification when required, you can ensure your ad account remains compliant and secure.
Following the steps explained above will help you easily verify your phone number and avoid confusion regarding missing verification options in Ads Manager.
Related Posts