In this article, we are going to learn how to generate Meta Pixel code in Events Manager. Meta Pixel is required when you want to track website visitors and create custom audiences using the website as a source.
Meta Pixel is created inside the Events Manager, which can be accessed either through Ads Manager or through Meta Business Suite. In this article, we will focus on generating the Meta Pixel code using Meta Business Suite and Events Manager.
This article explains the complete process of creating a Meta Pixel, copying the pixel code, saving it, and connecting it with an ad account.
Where Meta Pixel Is Created
Meta Pixel is created inside Events Manager, which is a tool provided by Meta to manage tracking data sources such as pixels.
You can access Events Manager in two ways:
- Through Ads Manager
- Through Meta Business Suite
In this explanation, we will access Events Manager using Meta Business Suite.
Accessing Meta Business Suite
First, log in to your Facebook account and switch to your Facebook Page. Once you are on your page, you can open Meta Business Suite.

Meta Business Suite is the central place where you manage business tools such as Events Manager, Ads Manager, and settings.
Opening Events Manager From Meta Business Suite
Step 1: Open Events Manager
Navigate Through All Tools
Inside Meta Business Suite:
- Look at the left-hand menu
- Click on All Tools
- Find Events Manager
If you do not see Events Manager immediately, you can search for it in the search bar.
Click on Events Manager to open it.

Understanding Events Manager
Events Manager is the place where:
- Meta Pixel is created
- Data sources are managed
- Website tracking is configured
To create a Meta Pixel, you must be inside Events Manager.
Creating a New Meta Pixel
Step 2: Click on Connect Data
Start Pixel Creation
Inside Events Manager:
- You will see an option to Connect Data
If you already have a Meta Pixel:
- You can find it inside Data Sets
If you are creating Meta Pixel for the first time:
- Click on Connect Data

Step 3: Select Web as Data Source
Choose Website Tracking
After clicking on Connect Data:
- Select Web as the data source
- Click on Next
This tells Meta that you want to track website activity.

Step 4: Name Your Meta Pixel
Give Pixel a Name
Now you will be asked to name your Meta Pixel.
For example:
- Meta Pixel 1
After entering the name:
- Click on Create
Connecting Meta Pixel With Ad Account
Step 5: Connect Pixel to Ad Account
Link With Ads Account
After creating the Meta Pixel:
- Meta asks whether you want to connect the pixel to an ad account
Select Yes and click Next.
This ensures your Meta Pixel can be used in ad campaigns.
Meta Pixel Creation Confirmation
After this step:
- Your Meta Pixel is successfully created
Now the next important step is copying the Meta Pixel code.
Copying Meta Pixel Code
Step 6: Open Pixel Setup
Go to Overview Section
After pixel creation:
- Go to the Overview section
- Click on Set Up Meta Pixel
If you are creating a pixel for the first time:
- A setup pop-up usually appears automatically
Step 7: Choose Manual Setup
Select Installation Method
In the setup options:
- Click on See Other Ways to Set Up
- Select Set Up Manually
- Click on Next

Then:
- Select Meta Pixel Only
- Click on Next

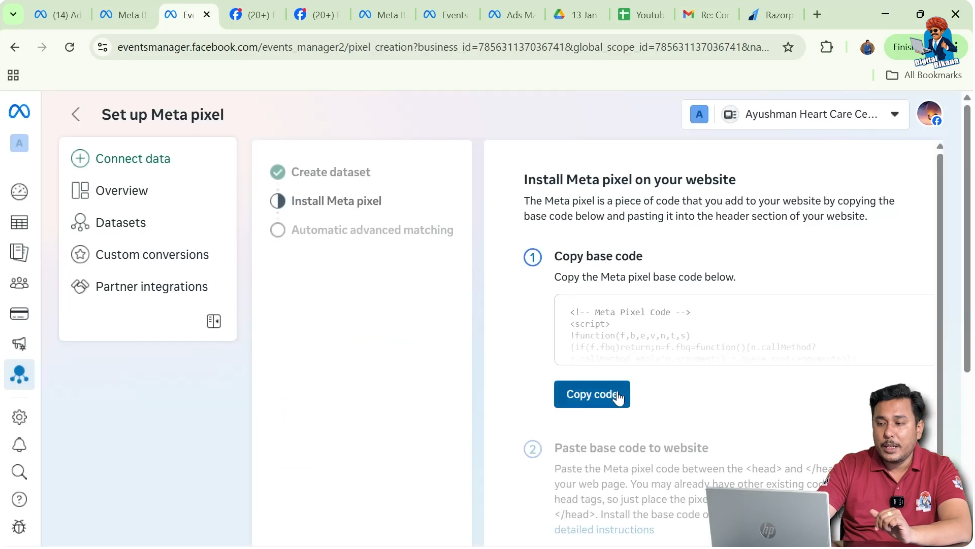
Step 8: Copy Meta Pixel Code
Copy the Tracking Code
You will now see the Meta Pixel tracking code.
- Copy the complete code
This is the code that must be added to your website later.
Saving Meta Pixel Code Safely
Step 9: Save Pixel Code in Text Document
Create Text File
To save the code safely:
- Right-click on Desktop
- Click New → Text Document
- Rename the file (for example: Smart Pixel)
Paste and Save Code
- Open the text file
- Paste the Meta Pixel code
- Save the document
This helps you store the pixel code securely for later use.
Alternative Method to Copy Meta Pixel Code
Sometimes, the setup pop-up may not appear automatically. In that case, you can copy the Meta Pixel code manually.
Step 10: Copy Pixel Code From Overview Section
Manual Copy Option
If the pop-up does not appear:
- Go to Data Sets
- Select your Meta Pixel
- Scroll down in the Overview section
- Click on Set Up Meta Pixel
- Choose Install Code Manually
- Copy the code
This gives you the same Meta Pixel code.
Connecting Meta Pixel to Ad Account Manually
Sometimes, the option to connect the Meta Pixel to the ad account does not appear automatically. In such cases, you can connect it manually.
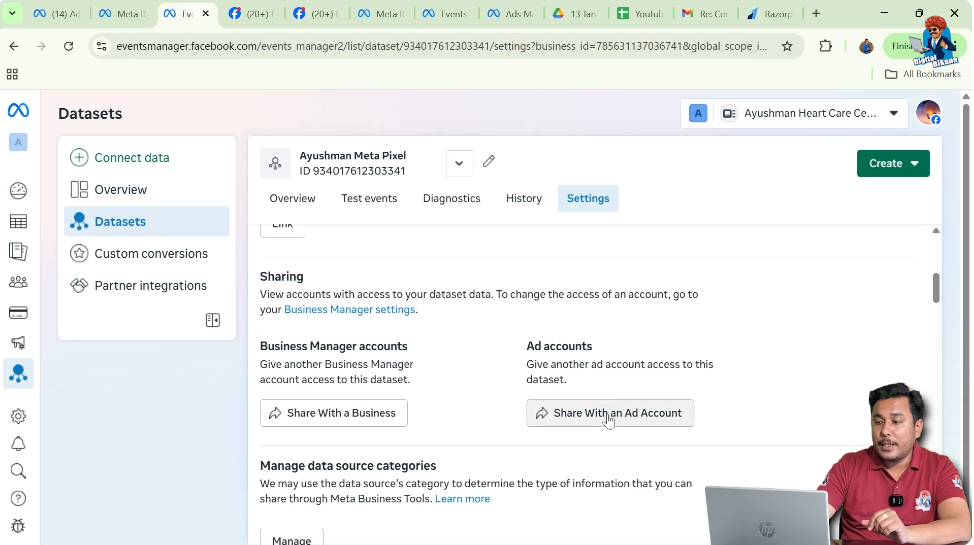
Step 11: Open Pixel Settings
Go to Data Set Settings
Inside Events Manager:
- Click on your Meta Pixel
- Go to Settings
Step 12: Open Ad Accounts Section
Access Connected Assets
Inside settings:
- Find the Ad Accounts section
- Click on it
This redirects you to Meta Business Suite settings.
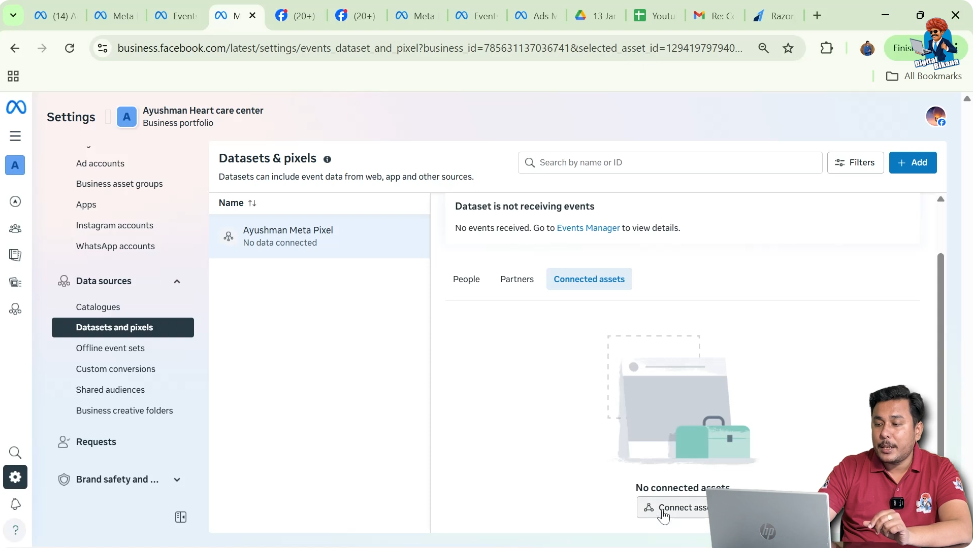
Step 13: Connect Ad Account
Add Ad Account
Inside Business Settings:
- Go to Data Sources

- Select Pixels
- Choose your Meta Pixel
- Click on Connected Assets

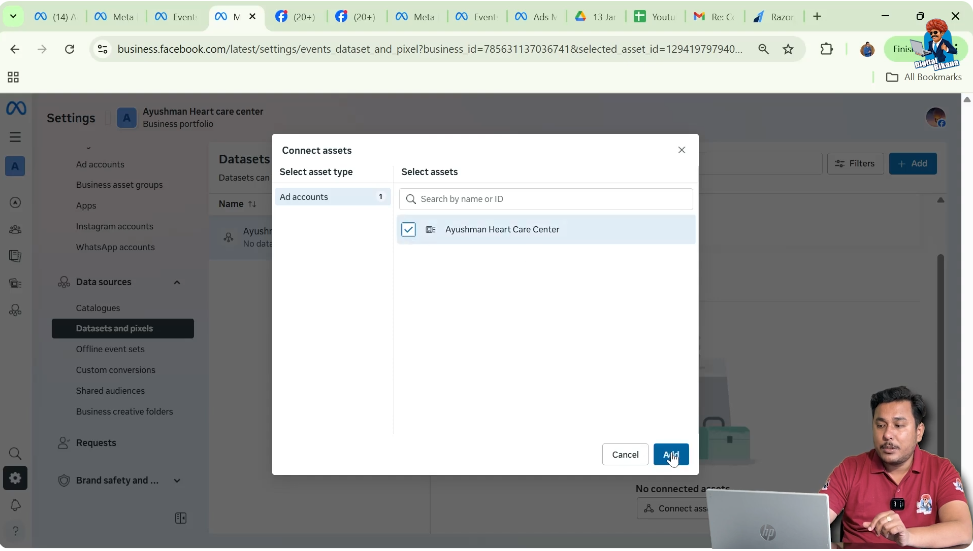
- Click Connect Assets
- Select Ad Account
- Click Add
Verifying Email for Connection
Step 14: Verify Business Email
Email Verification Required
While connecting the ad account:
- Meta may ask you to verify your email

Steps:
- Click Send Email
- Check your inbox
- Copy the confirmation code
- Paste the code
- Click Submit
Connection Confirmation
After verification:
- Meta Pixel is successfully connected to your ad account
Final Status of Meta Pixel Setup
At this point:
- Meta Pixel is created
- Pixel code is copied and saved
- Pixel is connected to ad account
Now your Meta Pixel is ready to be installed on your website.
Why Connecting Pixel to Ad Account Is Important
Connecting Meta Pixel to your ad account allows you to:
- Track website visitors from ads
- Create website-based custom audiences
- Use pixel data in ad campaigns
Without connecting the pixel, tracking and retargeting will not work properly.
Meta Pixel Setup Explained in Simple Words
In simple terms:
- You open Events Manager
- You create a Meta Pixel
- You copy the pixel code
- You connect it to your ad account
- You save the code for website installation
Common Mistakes to Avoid
- Do not forget to connect pixel to ad account
- Do not lose the pixel code
- Do not skip manual setup if pop-up does not appear
Following all steps ensures smooth Meta Pixel creation.
Final Conclusion
Generating Meta Pixel code in Events Manager is a critical step for tracking website visitors and running effective Facebook ad campaigns. By accessing Events Manager through Meta Business Suite, connecting a web data source, naming the pixel, and linking it to an ad account, you can successfully generate your Meta Pixel.
Copying and saving the pixel code ensures you can install it on your website later. If automatic pop-ups do not appear, manual options are available to copy the code and connect the ad account.
Once these steps are completed, your Meta Pixel is fully set up and ready to track website activity and support custom audience creation.
Related Posts