If you want your website to appear properly in Google search results, connecting it with Google Search Console is essential. Google Search Console helps you monitor your website’s performance, indexing status, and visibility in search results. One of the most important steps in connecting your website with Google Search Console is submitting your sitemap.
In this article, you will learn how to add your website to Google Search Console by submitting your sitemap step by step. The explanation is simple and detailed so that you can follow it easily.
Understanding Google Search Console
Google Search Console is a free tool provided by Google that helps website owners monitor and maintain their presence in Google Search results.
With Google Search Console, you can:
- Track search performance
- Monitor indexing status
- Identify crawling errors
- Submit sitemaps
- Analyze keyword performance
To connect your website properly, submitting your sitemap is an important step.
Accessing Google Search Console Dashboard
Before adding your website, you must log in to Google Search Console.
Open Google and search for Google Search Console. Click on the official platform link and log in using your Google account.
Once logged in, you will reach the Google Search Console dashboard.
If your property is already verified, you will see your website listed. If not, you must first verify domain ownership before proceeding.
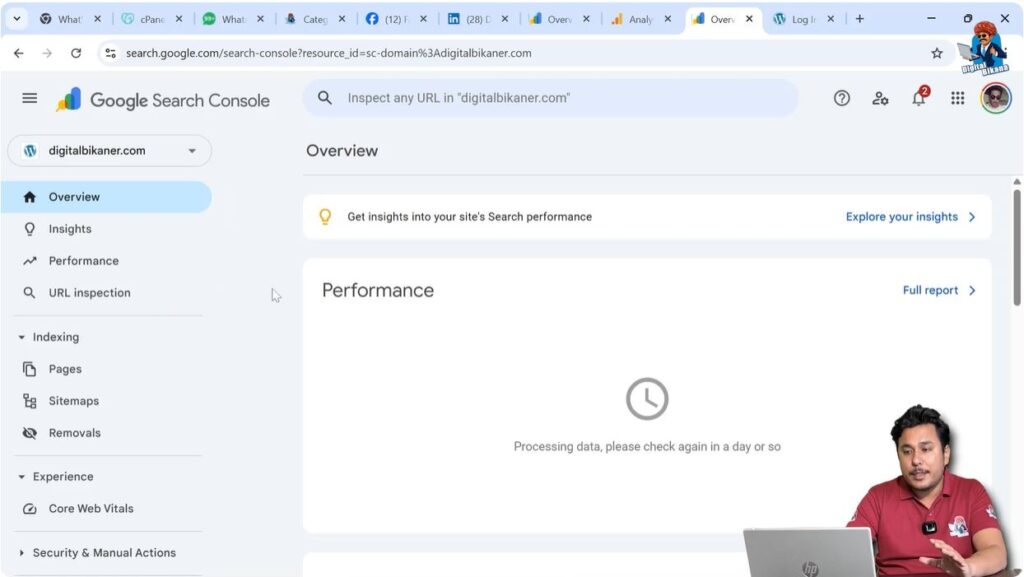
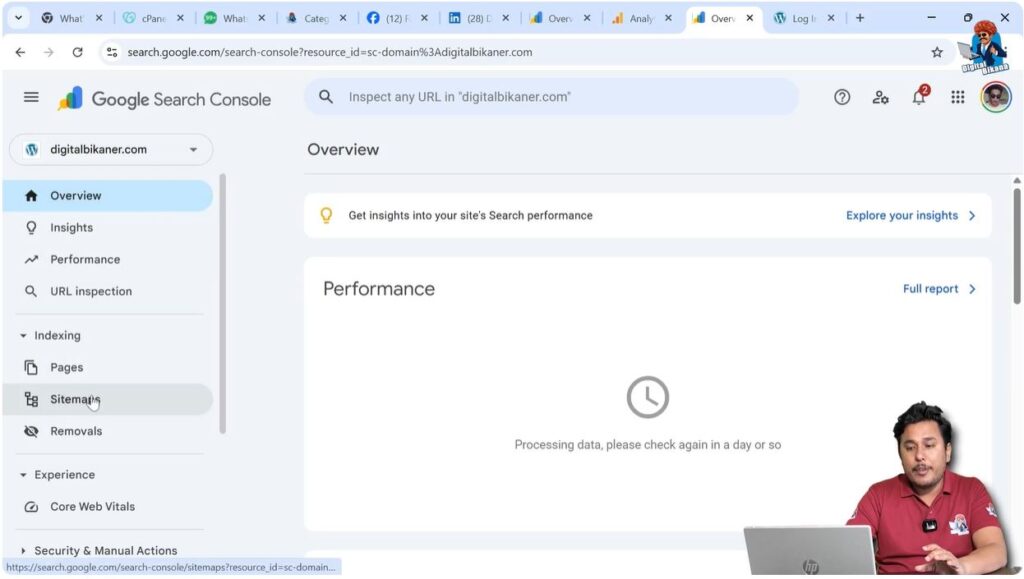
Locating the Sitemap Option
After reaching the dashboard, look at the left side toolbar.
You will see several options related to performance, indexing, experience, and more.
Step 1: Open the Sitemap Section
In the left side menu, find and click on the Sitemaps option.
Once you click on Sitemaps, a new screen will appear where you can submit your sitemap URL.
Understanding the Sitemap URL
A sitemap is a file that contains a list of all important pages of your website. It helps Google crawl and index your website efficiently.
In WordPress, the sitemap is usually generated automatically.
The standard sitemap format for WordPress is:
https://yourdomain.com/sitemap.xml
For example:
If your domain name is:
digitalbikaner.com
Then your sitemap URL will be:
digitalbikaner.com/sitemap.xml
You must use your own domain name followed by:
/sitemap.xml
Submitting the Sitemap
Now let us proceed with submitting the sitemap.
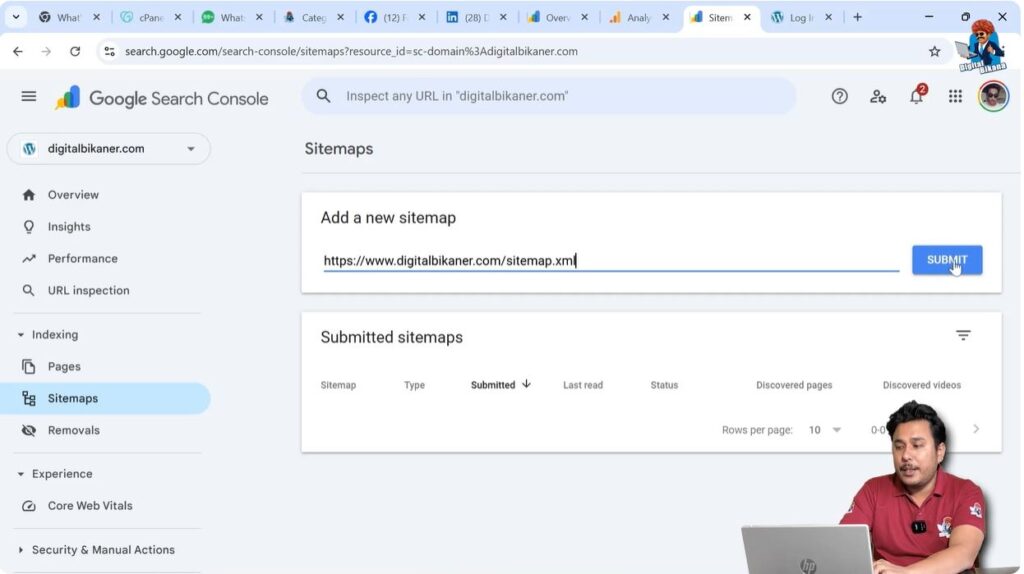
Step 2: Enter the Sitemap URL
In the Sitemaps section, you will see a field asking for the sitemap URL.
Enter your domain name followed by:
/sitemap.xml
For example:
digitalbikaner.com/sitemap.xml
After entering the correct URL, click on the Submit button.
Checking the Submission Status
After clicking submit, Google Search Console will attempt to fetch your sitemap.
Initially, the status may show:
Could not fetch
There is no need to panic.
Sometimes, it takes a few seconds or minutes for Google to process the sitemap.
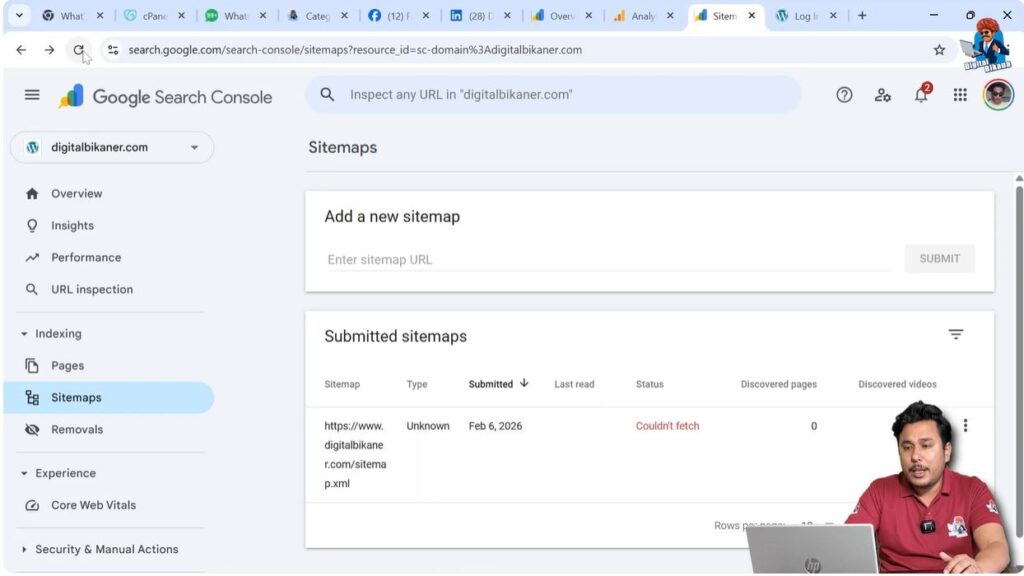
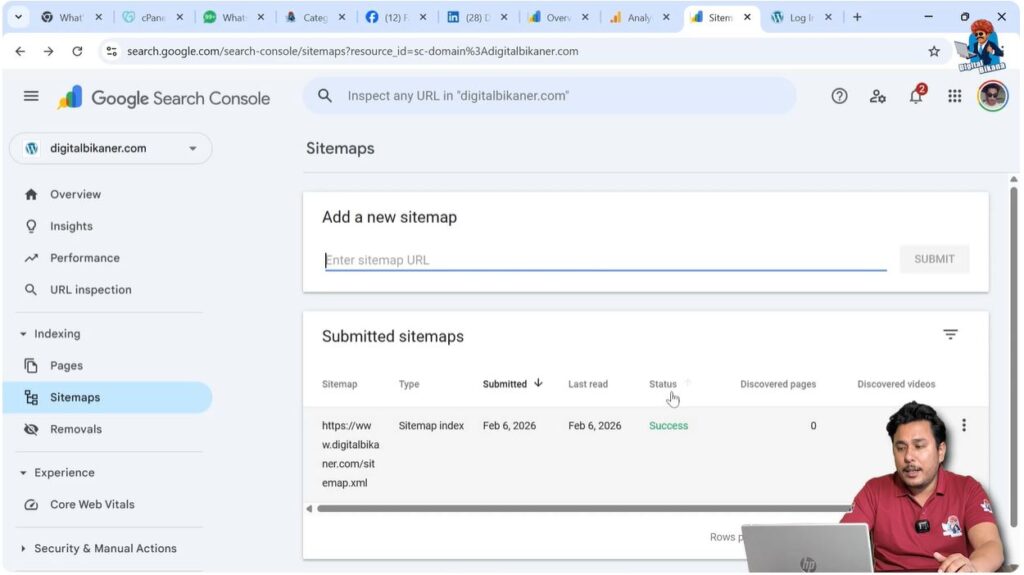
Step 3: Refresh the Page
Wait for a short time and refresh the page.
In most cases, the status will automatically change to:
Success
Once the status shows success, your sitemap has been successfully submitted.
Why Sitemap Submission Is Important
Submitting a sitemap helps Google in the following ways:
- It allows Google to discover new pages faster.
- It improves crawling efficiency.
- It ensures updated content is recognized.
- It helps search engines understand your website structure.
Without a sitemap, Google may still crawl your website, but submitting one improves indexing speed and accuracy.
How Sitemap Connects Your Website to Google
When you submit your sitemap:
- Google reads the sitemap file.
- It checks the URLs listed inside it.
- It crawls those pages.
- It indexes relevant pages.
This process ensures your website is properly connected with Google Search Console and visible in search results.
Common Issues After Submission
Sometimes you may see errors such as:
- Could not fetch
- Invalid sitemap format
- No URLs found
These errors usually occur because:
- The sitemap URL is incorrect.
- The website is not publicly accessible.
- The sitemap file does not exist.
Make sure your sitemap URL opens correctly in a browser before submitting it.
Verifying the Sitemap Manually
Before submitting, you can test the sitemap manually.
Open a new browser tab and type:
https://yourdomain.com/sitemap.xml
If the sitemap opens and displays structured XML content, it means it is working correctly.
If it shows an error, you need to fix the sitemap configuration first.
Monitoring Submitted Sitemaps
After successful submission, you will see:
- Sitemap URL
- Submission date
- Last read date
- Status
You can monitor these details regularly to ensure your sitemap remains active and error-free.
How Often Should You Submit Sitemap
You only need to submit the sitemap once.
WordPress automatically updates the sitemap whenever you publish new pages or blog posts.
Google periodically checks the sitemap and updates indexing accordingly.
There is no need to resubmit it repeatedly.
Benefits of Connecting Website with Google Search Console
Once your website is connected through sitemap submission, you can:
- Monitor impressions and clicks
- Track keyword performance
- Identify indexing errors
- Analyze page performance
- Improve SEO strategy
Google Search Console provides valuable insights that help improve website ranking.
Final Confirmation
After refreshing the Sitemaps page and seeing the status as Success, your website is successfully added to Google Search Console.
This means:
- Google can crawl your pages
- Your website structure is understood
- Indexing process has started
Now you can focus on optimizing your content and monitoring performance.
Conclusion
Adding your website to Google Search Console by submitting the sitemap is a simple and important step. By navigating to the Sitemaps section, entering your domain name followed by /sitemap.xml, and clicking submit, you connect your website properly with Google.
If the status initially shows “Could not fetch,” simply refresh the page after a short wait. Once the status changes to “Success,” your sitemap submission is complete.
Following these steps ensures your website is properly connected with Google Search Console and ready to perform in search results.
Related Posts